Showing posts with label love. Show all posts

Saturday, February 18, 2012

Creamy Spaghetti of Lobster and Breaded Veal Scallopini


My family flipping loves shellfish, especially lobsters and since the lobsters were on sale for 7.99/lb, I went and bought two for merely 50 bucks. Instead of boiling the dears alive (ahaha, gotta love my vegetarianism!), I gave them a quick death by piercing a knife swiftly into their head and between their eyes. I placed the lobsters in a pot with minimal boiling, salted water and steamed them for around 15 minutes. When cool enough to touch, I cracked them open, took out all the succulent meat, cut them into to chunks and set aside for the sauce. For extra lobster richness and flavor, I also scooped out the brains and reserved them for the sauce (sounds gross, I know, but it is soooo worth it!).
I made a simple béchamel sauce (that is actually vegan so that I could later use in my own pasta dish) and reserved it.While I boiled my spaghetti noodles (which were basil and tomato flavored), I sauteed some garlic with olive oil and the brains in a frying pan until aromatic and added in a splash of white wine, cooking it down as I added in the lobster meat. Season lightly with salt and pepper before spooning in the bechamel sauce, letting all the flavors mingle and simmer on low heat. As soon as the pasta was al dente, I scooped the pasta into the sauce and mixed it together with a ladle of the pasta water, which helps the sauce adhere to the noodles. Stir in some freshly chopped flat-head parsley (aka Italian parsley) and serve hot.
I served the spaghetti of lobster alongside breaded veal scallopini, topped with brussel sprouts that were cooked in a balsamic vinegar reduction. It's a very low-in-fat meal since the sauce is made with low-fat soy milk and olive oil rather than whole milk and butter. The breaded veal were fried lightly in grapeseed oil, so the fat content there is also low. Nutritious and delicious!!


 ~*~*~*~*~*~*~*~*~*~*~*~*~

Vegan Béchamel Sauce
1/4 cup olive oil
1/4 cup flour
1 cup low-fat unsweetened soy milk/unsweetened almond milk
salt and pepper to taste

In a sauce pan, heat the olive oil on medium-low heat. Whisk in the flour and cook for 3 minutes to create a roux. Stir in half the cup of milk and whisk until smooth; whisk in the remainder. Leave to simmer until thickens, then season to taste.

~*~*~*~*~*~*~*~*~*~*~*~*~
For my own veggie dinner, I had breaded eggplant rounds (I LOVE EGGPLANT) and a baked tofu and eggplant spaghetti with the vegan béchamel sauce. The baked tofu is a recipe that I tried out by The Vegan Zombie, and he has got me hooked. I've always disliked cooking with tofu but this baked tofu recipe is absolutely something I will make again.

EGGPLANT!!


To wash it all down, my brother made us a refreshing, non-alcoholic beverage that is to DIE for! It's called Targa 911 and it is soooo goood!

1 1/2 oz. orange juice
1 1/2 oz. passion-fruit juice
3/4 oz. pineapple juice
3/4 oz. lemon juice
3/4 oz. non-alcoholic grenadine
1/2 cup ice

Stir all ingredients together in a cup or use a shaker. SO GOOD.

Friday, November 18, 2011

Quick and Easy Noodle Soup


My favorite type of comfort food is noodle soup, especially when it is freezing cold and I just got home with a frazzled brain due to an exam. This egg noodle soup that I whipped up used instant noodles that I found in my pantry, discarding the soup base packaging and cooking up my own soup stock using water, sesame oil, mushroom granules, salt, pepper, mushrooms and broccoli (or whatever vegetable you have in your fridge like carrots, bok choy, cauliflower, etc. or if need be, veggie stock). I found some frozen veggie bbq pork and I defrosted that to use as a toppingg, along with an egg, leek and fried onions.
All this took me 10 minutes. It`s my kind of fast, healthy, comfort food. No msg!

Sunday, November 13, 2011

Autumn Pot Pie


I love pie, either desert or savory, I love them all! I came across a pot pie that used squash as a filling and since I love squash and I love pie, I decided to try it with my own revision of the recipe.
My fillings for the autumn pot pie had kabocha squash, carrots, potatoes, leek, celery and some spices such as nutmeg, cloves and coriander powder. All were simmered with some water in a pot to make something like a stew, then seasoned with salt and pepper.
Of course, you can add whatever you want as the filling but that was what I had and wanted in the pie.
I doubled a basic pie crust recipe, which made approximately 10 pies with some dough left over. I divided the crust into aluminum pot pie pans, filled them up with the filling, covered with a vented pie top and brushed with milk (you can brush with egg white to give it a better shine).
Yum, yum, yum, I'm going to make these again!


Saturday, November 5, 2011

Mommy, I Made Pho


This is the first time EVER that I made pho all by myself, without the help of my mom, who is not back from Vietnam yet. Today is my dad's birthday and his favorite dish is Pho. If you do not know, pho is a Vietnamese noodle dish consisting of rice noodles, spiced beef broth, beef slices, beef meatballs, beef brisket, beef tripe and tendons, accompanied with white onions, basil, mint leaves, bean sprouts, lime, chili peppers, cilantro, green onions, culantro/Eryngium foetidum (ngo gai), hoisin sauce, chili sauce and fish sauce. A lot of ingredients, I know. The pho I made only featured rare beef slices, beef meatballs and beef tendon.
There are many other variations, such as chicken pho or seafood pho but traditionally, it is beef. Sometimes an egg is added for EXTRA protein haha.
The most crucial part of a good bowl of pho is the broth. The criteria includes it being clear NOT MURKY, aromatic and full of flavor from hours of simmering beef bones, charred yellow onion, charred ginger and toasted spices such as cardamom, cinnamon sticks, star anise, cloves and coriander seeds. The entire dish took me 3-4 ish hours to prepare...phew.
Also, beef tendons are a bitch to cook. It takes waaaay more than 3-4 hours to get soft all the way through, so I suggest you put it in a slow cooker and cook it over night if you ever want to make pho. PAH.
No, this is not a quick dish.
Why did I want to go through the endeavor to make it from scratch? Because I am passionate about my food and it's my daddy's birthday. It's worth it either way. Plus my brother slurped up his entire bowl of soup, so I know it is good (he never slurps up an entire bowl of broth if it is not good, no matter who makes it).
So, if you want Pho without cooking it, go ahead and go buy a bowl at a Viet restaurant. I assure you they use msg, sweeteners and not a lot of good ol beef bones for the broth. Or, if you want to make it, then go ahead and go buy those pre-packaged pho spices and add it to a pot of ready made beef broth from Campbell. I promise you, it won't be the same.

Broth for two people:

1-2 lbs of beef bones
1 lb of oxtails
half a small cabbage

1 medium yellow onion, unpeeled
1 medium sized knob of ginger, unpeeled

4 sticks of cinnamon
5 anise stars
4 black cardamom bulbs
1 tsp of cloves
1 tsp of coriander seeds

1 tbsp brown sugar
Salt and mushroom granules for taste

In a large pot that can hold up to 6 cups of water, bring the bones with 1 tbsp of salt to a boil and skim off any foam and fat that emerges to the surface. Add in the cabbage once there is no more foam to skim and simmer for 30 minutes.
During the wait, char the onion and ginger on a grill or over a mesh on a gas burner until the onion skin and ginger are almost completely black and become aromatic. Let cool and under running water, scrap and peel off as much of the blackened bits as you can. Add to the pot of broth and simmer for 30 minutes.
Dry roast the spices in your oven or in a skillet over the stove until aromatic. Let the spices cool and tie it up in a spice bag or make a spice package with coffee filters, tied with kitchen twine. Plop that into the broth and simmer under medium-low heat for 1-2 hours. DO NOT COVER with a lid. If you feel there is not enough water, then you better turn the heat lower and add more water.
After 1-2 hours, broth should be aromatic with the spices. Gently stir in sugar and season with salt and mushroom granules to your taste. If you don't have mushroom granules, then salt should just be fine. Turn the heat to high and bring to a quick boil. Spoon hot broth over cooked rice noodles and your choice of toppings. Best served hot ;)
Enough for four servings.

Pho with beef balls, rare beef slices and beef tendon.

Friday, August 12, 2011

Steelhead Trout: Baked in Exotic Herbed-Butter


Quick dinner today featuring steel-head trout baked in an aromatic butter spiked with Thai basil, coriander and mint. The fish takes 20-25 minutes to cook in a 375 C oven. Served with rice and a drizzle of coriander-lime brown butter. As for me, I had some fresh goat-cheese ravioli with fresh pasta sauce with lotssss of garlic and lotsss of basil.

Coriander-Lime Brown Butter

6 tablespoons unsalted butter
3 tablespoons fresh lime juice
1 tbsp fresh or dried coriander seeds
1 tsp lime zest
salt and ground black pepper to taste

Place the butter in a saucepan over medium-low heat. Cook until the butter turns a golden brown color, and takes on a nutty aroma. Reduce heat and keep warm until ready to serve. When ready to serve, turn the butter up to medium heat and whisk in the lime juice. As soon as the mixture comes to a boil, add the coriander seeds and zest, turn off the heat and spoon on fish and rice.


Wednesday, August 3, 2011

Raspberry Chipotle Flat Chicken


Hello all! I have been away to Montana since the last time I posted and I haven't had time to cook or bake since I got back. My dwelling is undergoing major renovations and that also includes a re-installment of cabinets and the counter top in our kitchen including refinishing and repainting walls and tiles. Before completely demolishing our kitchen, I made this dish using a sauce I bought in Helena, Montana. It's a "Roasted Raspberry and Chipotle Sauce," and though the idea of a fruit and spices usually does not mix well for me, this sauce had me go head-over-heels. I found this beauty at the local Costco Warehouse, sampled on a thin whole grain cracker with brie cheese. I basically melted along with the soft cheese as soon as the morsel was in my mouth. Tangy-sweet with a bit of savoriness from the cheese and cracker, it was a divine bite. What was even more incredible was the little kick of spiciness that rocked all the flavors together. It was f****ing delicious. Back at home with my prized bottle of the sauce, I couldn't wait to try it on the suggested meats (poultry, pork, salmon) and appetizer suggestions.
This chicken dish is the first time I have used the sauce since I bought it and I loved the color it gave the roasted chicken (as my family gobbled up almost all the bird). I decided to flatten (butterfly) the chicken so that it would be seasoned better, cooked faster and carved better.  To flatten a chicken, all you do is remove the spine and the breast bone (keel bone) so that you can flatten the bird out and have less bones to worry with when carving. When you season, the spices you use will be better penetrated into the meat so that your bird will be seasoned all over rather than just on the skin. Here's a great instructional video with how to butterfly a chicken.

I dry rubbed my chicken with salt, pepper, and garlic powder (around 1-2 tsp of each) and roasted it at 200-250 degrees Celsius for about 45 minutes in my glass conventional oven* until the skin was semi-golden brown. I then brushed the bird with 2 tbsp of the Raspberry Chipotle and let it roasted for another 5 minutes until the sauce melted right into the chicken and the skin was glossy and golden. I let the bird rest for 15 minutes before carving so that the meat would retain heat and not dry out. I served the chicken with brown rice, pea tips sauteed in garlic and baked zucchini rounds. Our "last supper" before our kitchen's doomsday.

*butterfly chicken is awesome on the BBQ too so go ahead and preheat your grill to medium-high heat and grill the bird to your liking!


Saturday, July 16, 2011

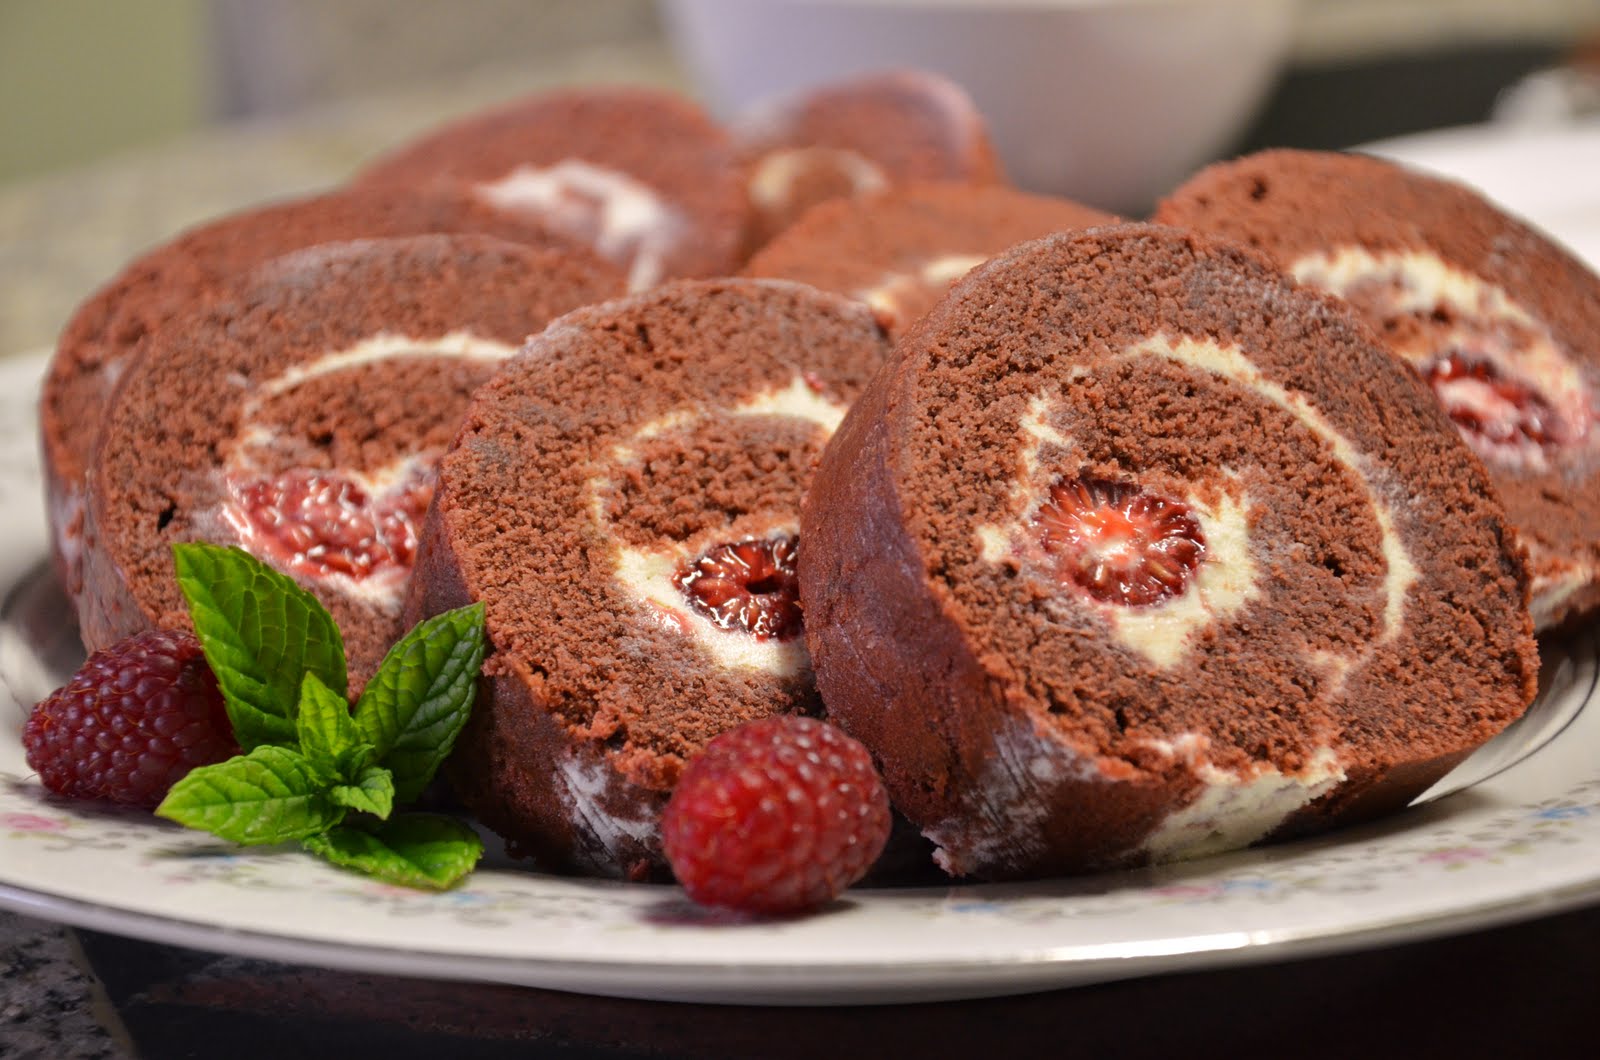
Red Velvet Cake Roll


So here is the Red Velvet Roulade Cake that I chilled over night. And all I have to say is, "I flippin' love it!!"

Recipe Courtesy of Flo Baker

Red Velvet Cake

Ingredients

For the cake
  • 1 cup (4 1/2 ounces) all-purpose flour
  • 2 tablespoons unsweetened natural cocoa powder
  • 1/2 teaspoon baking soda
  • 1/8 teaspoon salt
  • 1/2 cup (4 fluid ounces) milk
  • 1 teaspoon pure vanilla extract
  • 1 teaspoon 1 teaspoon apple cider or white vinegar, 5% acidity*
  • 4 ounces unsalted butter , at room temperature
  • 3/4 cup (5 1/4 ounces) granulated sugar
  • 1 large egg, lightly beaten
  • 1 tablespoon liquid red food coloring (1/2 fluid ounce)
For the white chocolate–cream cheese
  • One 8-ounce package cream cheese, at room temperature
  • 5 ounces white chocolate, melted
  • 2 ounces unsalted butter, softened
  • 1/3 cup (1 1/4 ounces) powdered sugar, sifted
  • 1 teaspoon pure almond extract
  • 1 cup (4 to 5 ounces) red raspberries, picked over for stems (optional)
For decoration
  • Powdered sugar for decoration
  • Red raspberries, picked over for stems, for serving

Directions

Make the cake
1. Center a rack in the oven and preheat the oven to 375°F (190°C). Coat a small area in the center of a 15 1/2-by-10 1/2-by-1-inch pan (jelly-roll pan) with nonstick spray. Line the pan with aluminum foil, pressing the foil into the contours of the pan and leaving a 2-inch overhang at each short end (the spray anchors the foil in place to make buttering easier). Butter the foil, then flour it, tapping out the excess flour. Have all of the ingredients at room temperature.
2. Sift together the flour, cocoa, baking soda, and salt onto a sheet of waxed paper; set aside. In a small bowl, stir together the milk, vanilla, and apple cider. In the bowl of a stand mixer fitted with the paddle attachment, beat the butter on medium-low speed until creamy and smooth, about 1 minute. Increase the speed to medium and add the granulated sugar in a steady stream. Continue to beat until light in color and fluffy in texture, about 2 minutes, stopping the mixer occasionally to scrape down the sides of the bowl.
3. With the mixer on medium speed, add the egg slowly, about 1 tablespoon at a time, beating after each addition until incorporated and stopping the mixer occasionally to scrape down the sides of the bowl. On the lowest speed, add the flour mixture in two or three additions alternately with the milk mixture in one or two additions, beginning and ending with the flour mixture and mixing after each addition only until incorporated smoothly. Stop the mixer after each addition and scrape down the sides of the bowl. Maintaining the same speed, add the food coloring and mix well to color the batter evenly. Without delay, spoon the batter into the prepared pan, spreading evenly with a rubber spatula.
4. Bake the cake until it is set on top and springs back when lightly pressed in the center, about 10 minutes. Transfer the pan to a wire rack. If necessary, run a thin knife blade around the perimeter of the pan to loosen the cake sides. Then pull up on the foil overhang and carefully transfer the cake to a wire rack. Without delay, place a sheet of foil over the cake and manipulate the foil to make a shallow tent (a tent holds in the moisture as the cake cools, but prevents the foil from sticking to the cake). Let cool for about 45 minutes, then proceed to assemble the dessert.
Make the white chocolate–cream cheese filling
5. In a bowl of the stand mixer fitted with the paddle attachment, beat the cream cheese on medium-low speed until smooth. Pour in half of the chocolate and beat until smooth, stopping the mixer occasionally and scraping the mixture clinging to the sides into the center of the bowl. Pour in the remaining chocolate and beat just until combined. Add the butter and then the sugar and almond extract and beat until smooth and creamy. Use right away, or store in a covered container in the refrigerator. When ready to use, remove from the refrigerator, bring to room temperature, and beat with a rubber spatula, small whisk, or fork until smooth and creamy. You should have about 1 1/3 cups.
Assemble the cake
6. Remove the foil from the top of the cake. Transfer the cake on its bottom sheet of foil to a work surface, placing it so that one of its long sides is parallel to the edge of the surface closest to you. Place another long sheet of aluminum foil on the work surface nearby.
7. Using an offset spatula, spread 1 cup plus about 2 tablespoons of the filling evenly over the cake, leaving a 1/2-inch border uncovered on the long side farthest from you. (The leftover filling, along with a few berries, makes a good kitchen snack for the baker.) Place the raspberries, if using, randomly on the filling along the length of the cake.
8. Begin rolling the cake by flipping the edge nearest you over onto itself. Then, with the aid of the foil that extends beyond the short sides, roll up the cake lengthwise until you reach the far long side. As you work, wrap the foil around the roll to assist in rounding the shape (otherwise the cake will stick to your hands). To insure the roll is uniform, place the roll in its foil across the bottom third of a 24-inch-long piece of parchment paper, bring the top edge of the paper toward you, and drape it over the cake roll, allowing a 2-inch overhang.
9. Place the edge of a rimless baking sheet at a 45-degree angle to the roll and your work surface. Apply pressure against the roll, trapping the 2-inch overhang, and push while simultaneously pulling the bottom portion of paper toward you. This push-pull motion creates a resistance that results in compressing the log into a uniform shape. If any cracks appeared as you rolled the cake, they are consolidated in this compression and disappear from view.
10. Carefully lift the roll in the aluminum foil and set it, seam side down, on the fresh sheet of foil. Wrap the cake securely in the foil. Transfer the foil-wrapped roll to the baking sheet or shallow tray and refrigerate for about 30 minutes to help set the filling.
To serve
11. Remove the cake from the refrigerator and peel off and discard the foil. Carefully lift the roll onto a serving plate with the aid of a long, wide spatula or a rimless baking sheet. (If not serving right away, cover loosely with plastic wrap to keep the cake’s surface from drying out and return to the refrigerator to serve the same day.) Dust the cake with powdered sugar. Using a serrated knife and a sawing motion, cut the roll into 1/2-inch-thick slices. Center each portion on a dessert plate. Accompany with the raspberries.

*Instead of using apple cider or vinegar, I used  raspberry vinegar that added an awesome kick to the cake and a fruity aroma to the cocoa. Yum yum!


Friday, July 15, 2011

Red Velvet Cupcakes with White Chocolate Topping


Okay...if Heaven was a cupcake, then I must have died at least 5 times. This must be one of the best red velvet cake recipes I have ever tried and the white chocolate-cream cheese topping is absolutely glorious! Topped with fresh raspberries, I felt so guilty but soooo pleased. The recipe itself is used to make a cake roll but I accidentally doubled the butter so I had to double everything else (clumsy me). I had enough for a roll and several mini cupcakes. The redness in my batter was less vibrant because I used a red gel rather than the liquid food coloring so I couldn't really estimate how much I needed but I love it nonetheless.
The cake roll required refrigeration time so I will post the results tomorrow. This would be my first time making a cake roulade...let's hope it's not a disaster? I will post the recipe of the roll and red velvet batter in the Red Velvet Cake Roll post.

Saturday, June 18, 2011

Totoro Cream Puffs


I had a major craving for cream puffs last night, so I whipped up some choux pastry and got a little creative. I piped the choux pastry into Totoro-shaped puffs and then added chocolate eyes and detailing after it cooled. The inspiration grew from a web-search I did several years back, whereas a fellow foodie did the exact same concept. Totoro is one of my most favorite characters from Japanese Animation; he stars in the film "My Neighbor Totoro" by the talented Hayao Miyazaki. He is known as the "keeper of the forest" appearing as a creature crossed between a raccoon, an owl and a rabbit.
Oh, and I used vanilla pastry cream as the filling.


Sunday, May 8, 2011

Gourmet Bún Riêu Cua B**ches!

Yeah, you read right: gourmet bún riêu cua, a noodle dish that is one of the top vendor foods in Vietnam. The original vendor dish is made with grounded paddy crabs, tomatoes, deep-fried tofu and an egg and shrimp paste mixture. The dish is sometimes known as tofu-curdle noodle soup, since the chunky eggs in the soup resemble curdled milk. The broth is colored with annatto seeds to produce a bright orangy-red color to the broth. Other ingredients such as pig blood is sometimes also added. The dish is accompanied with a variety of condiments ranging from chili pepper paste, fermented shrimp paste, limes, bean sprouts, shredded banana flower, spearmint, shiso leaves, and/or exotic leaves called rau kinh giới (Elsholtzia ciliata).
My mom made an incredible version using an amazing load of real crab meat, crab brains/innards, and crab paste, all of course, with tomatoes and egg (for lunch). It was basically a crab extravaganza! Served over vermicelli, this piping hot dish was so vibrant and aromatic that I almost gave in to its' temptation (even though I disliked this dish as a child and still do even if it was vegetarian-friendly) but I stood my ground!

Fun fact(s): "Bún" (boom) literally means noodle and "Riêu" (reew) means to simmer at low heat. "Cua" (goua) basically means crab so the dish is literally, "Simmering Crab Noodle" which explains the process of cooking: at low-medium heat to slowly simmer all the flavors of the crab and tomato together. Claaassic!!!

Wednesday, March 16, 2011

Baked Honeycomb Cake (Banh Bo Nuong)

This is one of the most signature dishes of my grandmother but her recipe and technique went with her when she passed away, waaaay before I was even born and waaaay before my mom even started to ovulate lol.
This Honeycomb cake is a very dense cake made from tapioca starch, which gives the cake a slight chewy texture. The cake must be both fluggy and chewy adn not dense enough to stick to your teeth lol. The name of the cake literally mean a "Cow Cake" or "Crawl Cake." As a fun fact from wiki, the cake is named so due to the similarities between the cake's texture and the texture of a cow's liver. Appetizing, eh?
There is a steamed version of this cake, I think, also called steamed rice cake, which originated in China, and is white in color and much softer. I have yet to make that one.
So this cake, is apparently very hard to make, and all my aunts have tried in the past and failed and though my mom loves this cake, she never even bothered trying lol. The tricky part is getting it to rise without proofing and the lack of gluten-support. So today, as a treat, I decided to try and make it following a recipe I found online that was in ENGLISH =D. It was very exciting. The instructions were very easy but, of course, being the goof I am, I forgot one critical step; the straining of the batter...so my cake had a few lumps. But besides that, the cake turned out awesome because I managed to get "honeycombs" and have the cakes still remain stable and not compacted (I realized the "honeycombs" are visible when you take a bite and look at the cake from a birds'-eye-view...another fun fact).
I am definitely going to make this again, but with coconut cream (I only had coconut milk), a little less sugar and a bit more pandan (maybe even fresh).
I bet my grandma's proud ^___^

Tuesday, March 8, 2011

Wonder Woman Cookies


Happy International Women's Day! Today is a day to celebrate all the achievements (big or small) made by all the women from every nook and cranny of the universe. And what a better tribute than cookies...of WONDER WOMAN?!? I felt like Wonder Woman this morning when I had to help my mom push her van out of a snow pile that she backed up into. I was the only one home at the time and she was driving out of the driveway to work. I have no idea how she ended up in the snow pile on the sides of our driveway. But I felt so awesome pushing the van out by myself while she was in the drivers seat. Hurrah for me haha!
So, I've had a piece of shortbread dough in my fridge for a week now and I was dying to make something and get creative. I used the cut-out method- individually cutting out the cookie shapes and attaching other parts to it (hair, colored areas, etc.). I then drew on her features and details with colored icing, although I'm not great at drawing faces. There were a few cookies that looked like men, but oh well lol. Total labor time was maybe around 4 hours minimum.

My Reference

First cut-outs with ref. pic as tracer

Addition of hair cut outs
Completed cookies before baking and detailing

BAKED!!
One of the cookies that actually looked good lol

Wednesday, February 16, 2011

Caramel Flan

Caramel Flan with Spun Sugar


I am a flan lover. I LOVE flan. It's basically a custard dish that is baked using the Bain-Marie or water bath technique. I have always thought it would be difficult to make so I always buy the ready-made flan at my local Asian Market. Today, I finally decided to make it after doing a lot of research on recipes, variations and techniques. I found a simple recipe/method on YouTube and so here is my first attempt EVER, at making flan. AND IT WAS A SUCCESS!!
I made the basic caramel flavor and it was awesome. I also tried my hand at spun sugar, which was a bit of a hassle since it was also my first time and I didn't have enough patience to properly set up an area to "spin" the sugar. I burnt one finger because I forgot how hot the sugar syrup would be...silly me.
Recipe for the flan is written below.

Caramel Crust:
In a saucepan, melt around 3/4 cup sugar on medium heat until liquefied and caramel in color. Pour a thin layer into ramekins or custard cups. Set aside.

Custard:

3 eggs
50 grams sugar
1 tsp vanilla extract/essence
500ml milk

In a bowl, gently whisk eggs and sugar together until sugar is dissolved. Add in vanilla extract and milk. Strain into a large measuring cup to remove the egg white strands and skim off any froth that is visible.
Pour mixture into ramekins, leaving 1 cm space between mixture and rim. Place ramekins in a roasting pan or double broiler and fill pan half way up with boiling water.
Preheat oven to 200 degrees Celsius and bake for 45 minutes until set. Remove and let cool on a rack for 10 minutes before placing into the fridge to chill for 4 hours. 
Loosen sides and flip onto a  plate (you may have to tap or shake it a bit for it to slide out).
Garnish with whatever you like or just serve plain. 

SO RICH, SMOOTH AND CREAMY!! IT TASTES LIKE BLISS IN HEAVEN!

Sunday, February 13, 2011

Pink Pancakes: Stacks of Love


Happy day-early Valentine's Day to those who are luckily in love or those who celebrate this "holiday." This year I am single but that doesn't mean I can't share a bit of my love.
This irresistibly sweet stack of love is perfectly fit for this occasion. Pink Pancakes studded with chocolate chips, stacked between layers of Smuckers strawberry jam, smothered with bittersweet chocolate sauce and topped with a dollop of whipped cream and pink mint and chocolate chips. Can you feel the love yet?