Showing posts with label cake. Show all posts

Saturday, May 31, 2014

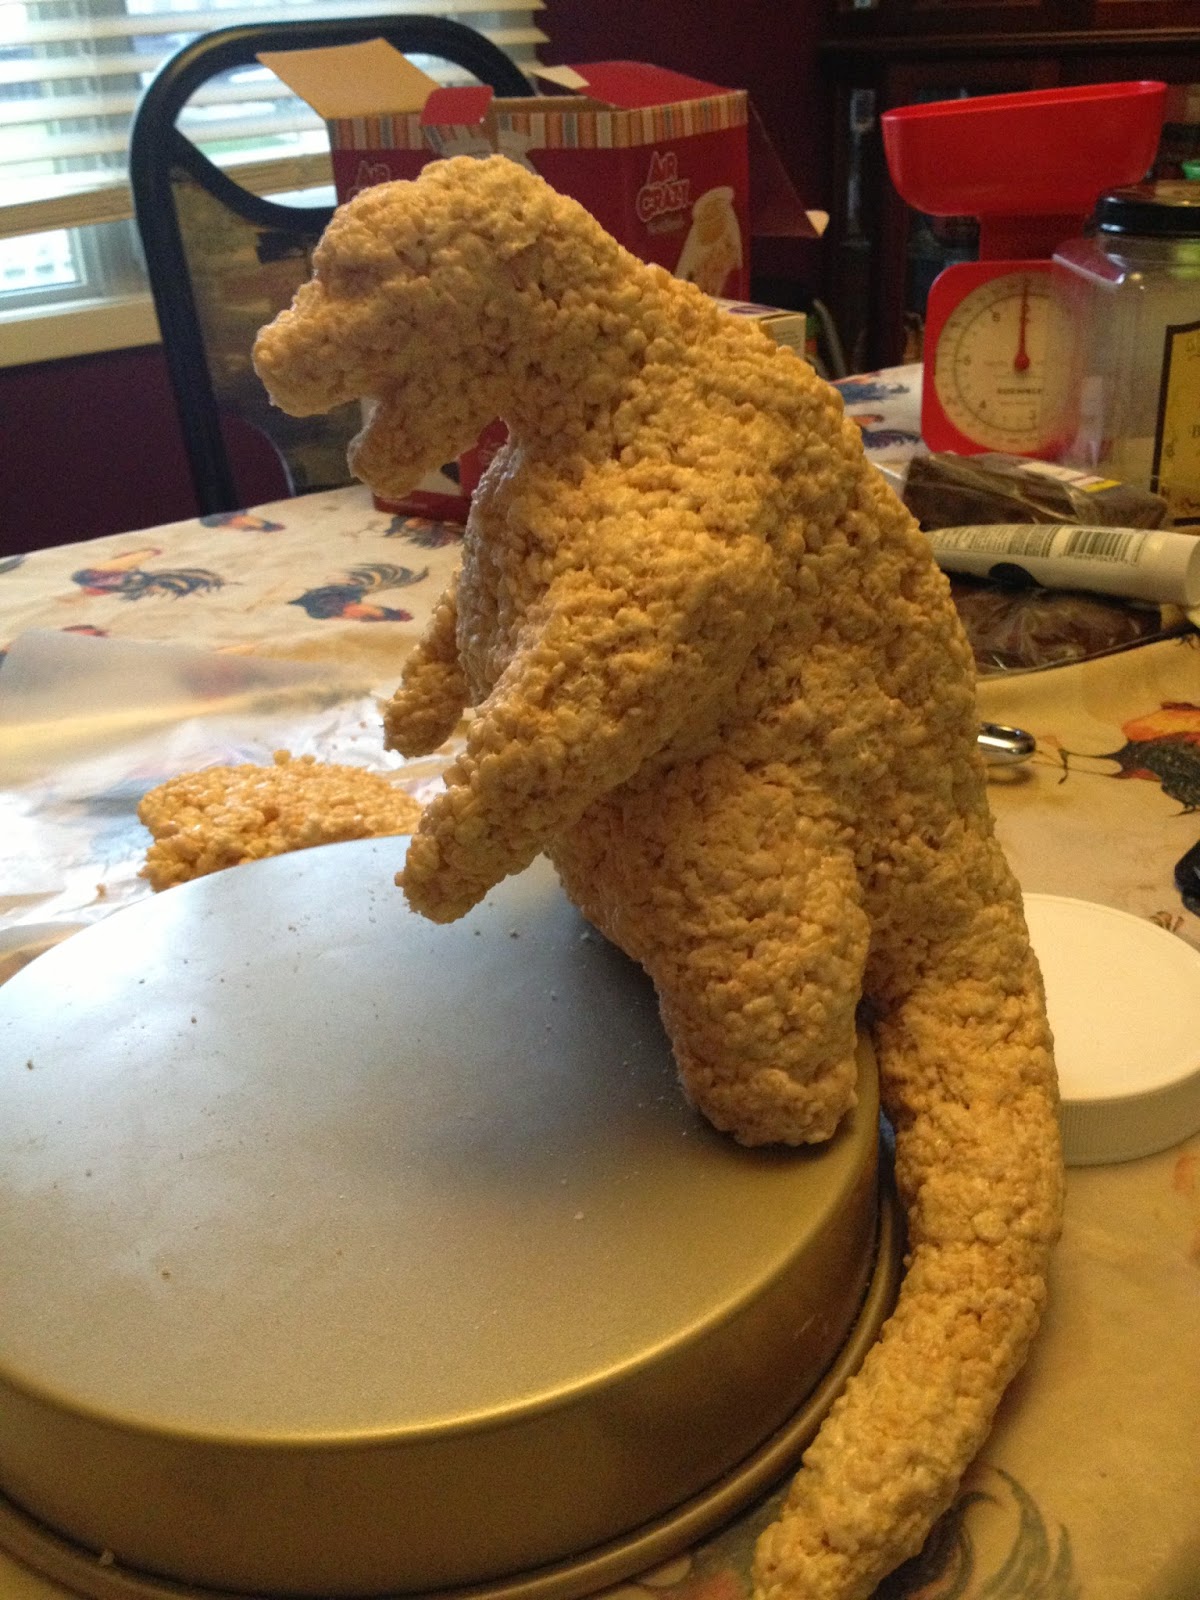
Godzilla Cake Topper


Hello!
So two weeks ago, Godzilla the movie came out and it was BAD-ASS. My lil bro, is the biggest Godzilla fan ever and his birthday fell ont eh week after the movie was released. So this year, mostly everythign he received was Godzilla based!
I took the liberty of decorating his cake, since I did not have time to bake him one from scratch, we ordered form a local cake-maker in Edmonton and I had a blank canvas to play with.
The cake topper is around 12 inches for a 10 inch cake, made from a rice crispy structure and covered with molding chocolate and fondant detailing, Food color was used to get Godzilla's greenish hue. The topper took me six hours to construct and sculpt, with overnight hardening and another hour to add detailing like the spikes (made form fondant).

Molding Chocolate Recipe.
250 grams dark choclate
1/4 cup corn syrup

Melt the chocolate in a double boiler. Let cool for 10 minutes on your counter, Stir in the corn syrup and stir until combined into a paste-like consistency. Place in an air tight container and leave in the fridge for 2 hours.
Knead to soften before use!


Saturday, May 26, 2012

The Avengers Birthday Cake!


I have always been a soft-core, Marvel fan and since watching The Avengers by Marvel, you might say it has become an obsession. On my quest to have everyone I know become obsessed with the Avengers, I bought tickets for my mom, dad, brother, and myself to watch the movie in 3D.
Carrying my obsession over to the culinary arts, I made a cake for my brother's birthday featuring the heroic group.
The cake is an Asian styled cake, layered with vanilla chiffon, pandan agar and a taro filling. The entire cake is covered in whipped cream then drawn on with homemade piping gel.
Homemade piping gel is so worth it to make because you get exactly the color you'd like and you can flavor it with whatever essence you'd like. The only downside is using it after it has been stored; the gel congeals and when you try to break it up, it becomes lumpy and is very hard to pipe. One of my foodie cousins helped me smooth out the gel so that I could pipe it out; it was a painstaking process and I would have lost my head if she didn't help me.
I had found a photo online that I modified and used as a template. The piping gel transfer did not work very well for me but it did enough for me to retrace the picture. After that it was just a matter of precision and patience. Since smaller details were very hard to pipe on, I omitted the eyes and some minor lines.
I was nervous of the outcome but near the end I was quite proud of my accomplishment. And not only that, the cake was a hit amongst the guests and Tommy really liked it. Success!

Homemade Piping Gel  (about 1/2 cup)*

1/3 cup granulated sugar
1 Tbsp. cornstarch (cornflour)
2 tbsp lemon juice
1/2 cup water
Gel Food Coloring of choice (opt)
Whisk sugar and cornstarch (cornflour) in a small saucepan.
Gradually add juice and then the water. Make sure there are no lumps.
Stir over medium/high heat until mixture boils and thickens.
Color as desired.
Will last about a month or so in the ‘fridge but will need to be at room temperature or reheated until smooth.

For the opaque white gel, I used 2 tbsp skim milk and omitted the lemon juice (cause it will curdle the milk). I also added a pinch of white vanilla powder for flavor.

I doubled the recipe for the primary colors, which was WAAYY too much. I have left over gel...what to bake next?


Thursday, April 12, 2012

Ube and Pandan Kaya Birthday Cake


Today was my mom's birthday and instead of ordering a cake, I thought I'd try my hand at one of the complex exotic cakes that is enjoyed in South/Southeast Asia. The cake is a fusion of Pandan Kaya Cake and Ube Macapuno Cake. Pandan is a tropical plant that is used as a flavoring for food and especially desserts. It gives off a green tone when used and is attractive in desserts. Ube is basically purple yam that is sweet and holds a magnificently rich, purple color. Macapuno is just young coconut meat that has been sliced and preserved in syrup. It is used as a filling paired with ube in Filipino cakes.
Since my mom loves pandan cake, coconut and the color purple, I fused the two together to create a green and purple-layered cake via an inspiration photo I found online. The layers of cake are filled with a buttercream and macapuno frosting. The entire cake is enclosed in "kaya," a solid, gelatinous casing made of coconut cream, pandan, sugar and agar-agar. Once chilled, the kaya keeps the cake moist and adds an extra bit of coolness to the cake to be enjoyed on hot days.
I decorated the cake with some whipped cream roses, which are hard as heck to make! I should have used a stiffer frosting or a stabilized whipped cream recipe but I didn't think of it...darn; next time.
This is also my first time to ever do any fancy-schmancy piping work on a dessert...so cut me some slack! Ahahaha! (I need to go get some lessons on piping >.<)

The cake took me two days to complete, with baking and chillin time or whatnot. Because I used preserved ube jam, the ube cake layers were too sweet for my liking, so I will get my hands on fresh purple yams for next time.
My mom was pretty stoked that I knew how to make this cake because it's always been a hassle to pre-order one.
I will try to make a taro-filled chiffon cake in the near future (which will be purple). :)

Makeshift mold extension for the kaya mixture.

Mommy cutting the cake!

Monday, November 14, 2011

Somalia Charity Bake Sale


I'm part of a Sociology club at my university and we joined another club to help fund raise for the Somalia Famine. Most of us fasted while other managed a bake sale. My contribution was 3 dozen Somalia-themed cupcakes, in vanilla and chocolate flavors (blue cupcake is just vanilla with blue food coloring) with good-ol' buttercream icing. For the blue tints in the icing, I used a duo-tone swirl technique for the blue swirls and the dollop of icing I sprayed with blue cake graffiti spray by Duff. The stars where homemade by piping out stars with melted white chocolate on parchment paper.
We raised a total of $750 sum over the course of three days for the bake sale.
It was rad!
The Somalia Flag


With a little of batter left over, I made mini cupcakes! <3

Monday, October 24, 2011

Craving Cake!

So...Vietnamese cakes are one of the best in the world, in my opinion. For my 18th birthday last year, I had a HUGE cake custom-made with an aromatic and sweet cheese-batter, similar to a Japanese cheesecake, with strawberry and whipped cream as a filling. It was HEAVEN. So, of course, I craved it...
Since I currently am in Vietnam, I went out and ordered one. While ordering, I was eying a cake up and down so I bought that cake for the day and the cheesecake for the next. My family in Vietnam thought it was somewhat abnormal to have cake without a reason...my reason was simple; I craved it.


So, the first cake I bought was a vanilla cake with chocolate frosting. The filling was something like a pineapple chutney, which was okay...just sucked that they didn't offer chocolate-battered cakes...


The second cake, for the second day, was, of course, the cheese-cake. IT WAS DELICIOUS. I was very impressed by the decor, white chocolate roses and all...even if the cake got a bit smooshed during transport. Only thing is, the cheese wasn't as pre-dominant as the one in my birthday cake...oh wellz.

Saturday, July 16, 2011

Red Velvet Cake Roll


So here is the Red Velvet Roulade Cake that I chilled over night. And all I have to say is, "I flippin' love it!!"

Recipe Courtesy of Flo Baker

Red Velvet Cake

Ingredients

For the cake
  • 1 cup (4 1/2 ounces) all-purpose flour
  • 2 tablespoons unsweetened natural cocoa powder
  • 1/2 teaspoon baking soda
  • 1/8 teaspoon salt
  • 1/2 cup (4 fluid ounces) milk
  • 1 teaspoon pure vanilla extract
  • 1 teaspoon 1 teaspoon apple cider or white vinegar, 5% acidity*
  • 4 ounces unsalted butter , at room temperature
  • 3/4 cup (5 1/4 ounces) granulated sugar
  • 1 large egg, lightly beaten
  • 1 tablespoon liquid red food coloring (1/2 fluid ounce)
For the white chocolate–cream cheese
  • One 8-ounce package cream cheese, at room temperature
  • 5 ounces white chocolate, melted
  • 2 ounces unsalted butter, softened
  • 1/3 cup (1 1/4 ounces) powdered sugar, sifted
  • 1 teaspoon pure almond extract
  • 1 cup (4 to 5 ounces) red raspberries, picked over for stems (optional)
For decoration
  • Powdered sugar for decoration
  • Red raspberries, picked over for stems, for serving

Directions

Make the cake
1. Center a rack in the oven and preheat the oven to 375°F (190°C). Coat a small area in the center of a 15 1/2-by-10 1/2-by-1-inch pan (jelly-roll pan) with nonstick spray. Line the pan with aluminum foil, pressing the foil into the contours of the pan and leaving a 2-inch overhang at each short end (the spray anchors the foil in place to make buttering easier). Butter the foil, then flour it, tapping out the excess flour. Have all of the ingredients at room temperature.
2. Sift together the flour, cocoa, baking soda, and salt onto a sheet of waxed paper; set aside. In a small bowl, stir together the milk, vanilla, and apple cider. In the bowl of a stand mixer fitted with the paddle attachment, beat the butter on medium-low speed until creamy and smooth, about 1 minute. Increase the speed to medium and add the granulated sugar in a steady stream. Continue to beat until light in color and fluffy in texture, about 2 minutes, stopping the mixer occasionally to scrape down the sides of the bowl.
3. With the mixer on medium speed, add the egg slowly, about 1 tablespoon at a time, beating after each addition until incorporated and stopping the mixer occasionally to scrape down the sides of the bowl. On the lowest speed, add the flour mixture in two or three additions alternately with the milk mixture in one or two additions, beginning and ending with the flour mixture and mixing after each addition only until incorporated smoothly. Stop the mixer after each addition and scrape down the sides of the bowl. Maintaining the same speed, add the food coloring and mix well to color the batter evenly. Without delay, spoon the batter into the prepared pan, spreading evenly with a rubber spatula.
4. Bake the cake until it is set on top and springs back when lightly pressed in the center, about 10 minutes. Transfer the pan to a wire rack. If necessary, run a thin knife blade around the perimeter of the pan to loosen the cake sides. Then pull up on the foil overhang and carefully transfer the cake to a wire rack. Without delay, place a sheet of foil over the cake and manipulate the foil to make a shallow tent (a tent holds in the moisture as the cake cools, but prevents the foil from sticking to the cake). Let cool for about 45 minutes, then proceed to assemble the dessert.
Make the white chocolate–cream cheese filling
5. In a bowl of the stand mixer fitted with the paddle attachment, beat the cream cheese on medium-low speed until smooth. Pour in half of the chocolate and beat until smooth, stopping the mixer occasionally and scraping the mixture clinging to the sides into the center of the bowl. Pour in the remaining chocolate and beat just until combined. Add the butter and then the sugar and almond extract and beat until smooth and creamy. Use right away, or store in a covered container in the refrigerator. When ready to use, remove from the refrigerator, bring to room temperature, and beat with a rubber spatula, small whisk, or fork until smooth and creamy. You should have about 1 1/3 cups.
Assemble the cake
6. Remove the foil from the top of the cake. Transfer the cake on its bottom sheet of foil to a work surface, placing it so that one of its long sides is parallel to the edge of the surface closest to you. Place another long sheet of aluminum foil on the work surface nearby.
7. Using an offset spatula, spread 1 cup plus about 2 tablespoons of the filling evenly over the cake, leaving a 1/2-inch border uncovered on the long side farthest from you. (The leftover filling, along with a few berries, makes a good kitchen snack for the baker.) Place the raspberries, if using, randomly on the filling along the length of the cake.
8. Begin rolling the cake by flipping the edge nearest you over onto itself. Then, with the aid of the foil that extends beyond the short sides, roll up the cake lengthwise until you reach the far long side. As you work, wrap the foil around the roll to assist in rounding the shape (otherwise the cake will stick to your hands). To insure the roll is uniform, place the roll in its foil across the bottom third of a 24-inch-long piece of parchment paper, bring the top edge of the paper toward you, and drape it over the cake roll, allowing a 2-inch overhang.
9. Place the edge of a rimless baking sheet at a 45-degree angle to the roll and your work surface. Apply pressure against the roll, trapping the 2-inch overhang, and push while simultaneously pulling the bottom portion of paper toward you. This push-pull motion creates a resistance that results in compressing the log into a uniform shape. If any cracks appeared as you rolled the cake, they are consolidated in this compression and disappear from view.
10. Carefully lift the roll in the aluminum foil and set it, seam side down, on the fresh sheet of foil. Wrap the cake securely in the foil. Transfer the foil-wrapped roll to the baking sheet or shallow tray and refrigerate for about 30 minutes to help set the filling.
To serve
11. Remove the cake from the refrigerator and peel off and discard the foil. Carefully lift the roll onto a serving plate with the aid of a long, wide spatula or a rimless baking sheet. (If not serving right away, cover loosely with plastic wrap to keep the cake’s surface from drying out and return to the refrigerator to serve the same day.) Dust the cake with powdered sugar. Using a serrated knife and a sawing motion, cut the roll into 1/2-inch-thick slices. Center each portion on a dessert plate. Accompany with the raspberries.

*Instead of using apple cider or vinegar, I used  raspberry vinegar that added an awesome kick to the cake and a fruity aroma to the cocoa. Yum yum!


Friday, July 15, 2011

Red Velvet Cupcakes with White Chocolate Topping


Okay...if Heaven was a cupcake, then I must have died at least 5 times. This must be one of the best red velvet cake recipes I have ever tried and the white chocolate-cream cheese topping is absolutely glorious! Topped with fresh raspberries, I felt so guilty but soooo pleased. The recipe itself is used to make a cake roll but I accidentally doubled the butter so I had to double everything else (clumsy me). I had enough for a roll and several mini cupcakes. The redness in my batter was less vibrant because I used a red gel rather than the liquid food coloring so I couldn't really estimate how much I needed but I love it nonetheless.
The cake roll required refrigeration time so I will post the results tomorrow. This would be my first time making a cake roulade...let's hope it's not a disaster? I will post the recipe of the roll and red velvet batter in the Red Velvet Cake Roll post.

Thursday, June 9, 2011

Rainbow Cupcakes


This is not the first time I've made these kind of cupcakes but I've never been able to take pictures of them because they always disappeared before I had a chance. These cupcakes were made for a student meeting I was suppose to attend but alas, the date changed at the last minute so I had two batches left over. Luckily, I have a family gathering coming up this weekend so these darlings won't have to go to waste. I seldom make cupcakes at home for indulgence but it's one of my favorite things to bring along to gatherings and parties.
The technique is very easy but a little time consuming to do. I mixed up some cake batter from scratch (you can use vanilla cake batter from a  box if you want) and divided the batter into 6 bowls. I mixed each bowl a different color and after lining up my cupcake pan, I spooned a small amount of purple, then a small amount of green, etc, until I finished with red. Follow the baking instructions on the box or whatever recipe of cake you are using, and voila.These cupcakes are layered with six colors of the rainbow and topped with a light homemade whipped topping. I sprinkled some rainbow chocolate chips on for extra color and sweetness since these cupcakes are not too sweet but are very light and delicate.


Wednesday, March 16, 2011

Baked Honeycomb Cake (Banh Bo Nuong)

This is one of the most signature dishes of my grandmother but her recipe and technique went with her when she passed away, waaaay before I was even born and waaaay before my mom even started to ovulate lol.
This Honeycomb cake is a very dense cake made from tapioca starch, which gives the cake a slight chewy texture. The cake must be both fluggy and chewy adn not dense enough to stick to your teeth lol. The name of the cake literally mean a "Cow Cake" or "Crawl Cake." As a fun fact from wiki, the cake is named so due to the similarities between the cake's texture and the texture of a cow's liver. Appetizing, eh?
There is a steamed version of this cake, I think, also called steamed rice cake, which originated in China, and is white in color and much softer. I have yet to make that one.
So this cake, is apparently very hard to make, and all my aunts have tried in the past and failed and though my mom loves this cake, she never even bothered trying lol. The tricky part is getting it to rise without proofing and the lack of gluten-support. So today, as a treat, I decided to try and make it following a recipe I found online that was in ENGLISH =D. It was very exciting. The instructions were very easy but, of course, being the goof I am, I forgot one critical step; the straining of the batter...so my cake had a few lumps. But besides that, the cake turned out awesome because I managed to get "honeycombs" and have the cakes still remain stable and not compacted (I realized the "honeycombs" are visible when you take a bite and look at the cake from a birds'-eye-view...another fun fact).
I am definitely going to make this again, but with coconut cream (I only had coconut milk), a little less sugar and a bit more pandan (maybe even fresh).
I bet my grandma's proud ^___^

Wednesday, February 2, 2011

Matcha Tiramisu Charlotte Cake

So...I made a green tea tiramisu Charlotte cake a week ago and forgot to make a post (sorry!!). I followed a recipe on Youtube but it didn't turn out quite as I wanted/expected it to be (I think I may have to give it another try). But I also think I'll stick to the original espresso tiramisu nonetheless.
Garnished with white chocolate curls and sprinkled with matcha green tea powder.

The ingredients.
(I realized I took a picture of the half and half cream
instead of the whipping cream. My bad)

Sunday, August 29, 2010

Pleasurably Blissful Apple Cheesecake

Arousingly Deliscious!
Apple Cheesecake = Sex on a plate.
I am serious. After coming home from my vacation to Vietnam, I craved that delicious and delicate dessert that was served with my flight meal, thus I told myself I would make it at home in my own kitchen. And I did!!
This is my first ever cheesecake. I had always shied away from making homemade cheesecake because the one time I ate homemade "cheesecake," it was not a pleasant experience.
So, after picking fresh apples from my apple tree and slave driving my best friend to peel them for me (lol just kidding) while I sliced, we (the fantastic duo) candied the apples, beat the cream cheese and crushed the graham crackers to great a stunning, smexy cake, drizzled with a creamy maple butter sauce. Doesn't that just turn you on? haha ;)

Apple Cheesecake

Crust
22 graham crackers, crushed
1/4 cup melted butter

Slowly add in the melted butter with the graham and mix until well blended.
Press onto the bottom of a springform cake pan.

Apples
3 large apples, peeled and sliced or 3 cups of small apples
Apples!!
2 tsp cinnamon (or more if needed)
1 1/2 tsp ground nutmeg (or more if needed)
1 1/2 cup brown sugar
2 tbsp cornstarch
1 tbsp butter

Mix all ingredients except butter together in a large bowl until incorporated.
Melt butter in a skillet or pot and add in apple mixture. Turn heat down low and simmer the apples, stirring occasionally until mixture thickens and the apples are tender. Remove from heat and set aside to cool.

Cake

3 blocks (250 g each) of cream cheese, softened
1/4 cup of the apple mixture, pureed
1 cup sugar
1 tsp vanilla
3 eggs

In a big bowl, on low speed, beat the cheese, the apple puree, sugar and vanilla until well combined. Crack on egg at a time into the cheese batter, beating on low speed. Scrape cheese batter into the cake pan.

Streusel Topping

1 cup packed brown sugar
1 cup flour
1/2 cup cold butter
1/2 cup oats quick oats

Cut butter, sugar and flour together to form course crumbs. Add in oats and mix evenly.

 Maple Butter Cream Sauce

2 tbsp butter
1/2 cup maple syrup
1/2 cup cream

In a small sauce pan melt the butter. Lower heat and add in maple syrup and cream. Stir and let simmer, while stirring occasionally until sauce thickens. Remove from heat and let cool.


The Masterpiece

Preheat oven to 320 degrees Celsius.
Evenly spoon the apple mixture over the cheese batter, making sure to cover the entire top. Sprinkle on the streusel topping, again, covering the entire top. Bake for 45-50 minutes or until set.
Remove from the oven, and cool. When pan is cool enough to touch, loosen edges of cake with a butter knife or rubber spatula. Unbuckle the pan and remove outer ring. Drizzle on the Maple Butter Cream and refrigerate for 4 hours or over night.
Sex in Your Mouth