Showing posts with label review. Show all posts

Saturday, May 26, 2012

The Avengers Birthday Cake!


I have always been a soft-core, Marvel fan and since watching The Avengers by Marvel, you might say it has become an obsession. On my quest to have everyone I know become obsessed with the Avengers, I bought tickets for my mom, dad, brother, and myself to watch the movie in 3D.
Carrying my obsession over to the culinary arts, I made a cake for my brother's birthday featuring the heroic group.
The cake is an Asian styled cake, layered with vanilla chiffon, pandan agar and a taro filling. The entire cake is covered in whipped cream then drawn on with homemade piping gel.
Homemade piping gel is so worth it to make because you get exactly the color you'd like and you can flavor it with whatever essence you'd like. The only downside is using it after it has been stored; the gel congeals and when you try to break it up, it becomes lumpy and is very hard to pipe. One of my foodie cousins helped me smooth out the gel so that I could pipe it out; it was a painstaking process and I would have lost my head if she didn't help me.
I had found a photo online that I modified and used as a template. The piping gel transfer did not work very well for me but it did enough for me to retrace the picture. After that it was just a matter of precision and patience. Since smaller details were very hard to pipe on, I omitted the eyes and some minor lines.
I was nervous of the outcome but near the end I was quite proud of my accomplishment. And not only that, the cake was a hit amongst the guests and Tommy really liked it. Success!

Homemade Piping Gel  (about 1/2 cup)*

1/3 cup granulated sugar
1 Tbsp. cornstarch (cornflour)
2 tbsp lemon juice
1/2 cup water
Gel Food Coloring of choice (opt)
Whisk sugar and cornstarch (cornflour) in a small saucepan.
Gradually add juice and then the water. Make sure there are no lumps.
Stir over medium/high heat until mixture boils and thickens.
Color as desired.
Will last about a month or so in the ‘fridge but will need to be at room temperature or reheated until smooth.

For the opaque white gel, I used 2 tbsp skim milk and omitted the lemon juice (cause it will curdle the milk). I also added a pinch of white vanilla powder for flavor.

I doubled the recipe for the primary colors, which was WAAYY too much. I have left over gel...what to bake next?


Monday, April 9, 2012

Hong Kong-Style Sausage Buns (Minis!)


I absolutely love making these! I had an entire bag of unopened cocktail smokies in my fridge and I did not want them to go bad. So I searched up a recipe for the Hong Kong-styled buns that the Chinese bakeries always sold because my brother loves to snack on them. The bread dough is a sweet, milk-based dough unlike the bread or pastry dough that pigs-in-a-blanket are usually wrapped in. The result is moist, sweet and yummy goodness!

They were so good the first time I made them, I decided to make a larger batch for a little Spring Party that I hosted at my house for the family. Recipe is an adaption of the recipe provided here.


Ingredients
  • 1 ¼ cup all purpose flour
  • 1 package active dry yeast
  • 2 tbsp sugar
  • 1 tsp salt
  • 2 large eggs, lightly beaten and divided
  • 2/3 cups lukewarm milk
  • 2 tbsp unsalted butter, softened
  • 8 hot dogs or around 20 cocktail smokies
  • sesame seeds (optional)
Method
  1. In a stand mixer bowl, stir together the flour, yeast, sugar and salt. Add in 1 of the lightly beaten eggs and the milk, stirring until it starts to come together. Attach the bowl to the stand mixer.
  2. Using the dough hook attachment, knead on medium-low speed (#4 on my KitchenAid) for 5 minutes. Add the softened butter and knead another 3 minutes or until the butter has been completely and thoroughly absorbed into the dough. The dough should feel smooth, satiny, and not sticky. If it's sticky, add more flour in tablespoon increments until you reach the right texture. The dough should pass the windowpane test (you can stretch it out very thinly without it breaking). Knead until it does.
  3. Spray a good size bowl with cooking spray. Take the dough out of the mixing bowl and form into a ball, pulling the sides down so that it becomes taut. Place the ball of dough in the greased bowl, cover it, and let it rise in a warm area for about 90 minutes, until about doubled in size.
  4. Take the dough out of the bowl and divide into 8 equal pieces, .
  5. To form the poofy rolls, roll out one of the dough pieces between your hands until it's about 2 to 2 1/2 times the length of the hot dog. If you want the center to be bigger than the ends, make sure you roll your dough accordingly, so that the middle of your long piece of dough is bulkier than the ends. Wrap the length of dough around a hot dog; it should be enough to make 3 loops, with the tapered ends at the bottom of the hot dog.
  6. Line a baking sheet with parchment paper. Place the shaped buns on the paper, leaving enough room in between each for the dough to have a place to go while it's rising.
  7. Cover the buns loosely with plastic wrap or a clean cloth (you don't want to ruin the rise by having to peel anything off them). Let the dough rise again for another 90 minutes or so, until it's about doubled in volume and look nicely plump.
  8. Meanwhile, preheat your oven to 400°F.
  9. When the buns have risen, gently brush egg wash (the remaining egg) generously onto each, making sure to get the sides as well, and sprinkle sesame seeds on top, if desired.
  10. Bake in the preheated oven for 8 minutes. Lower the temperature to 350°F and bake for another 5-8 minutes, until the buns are an attractive golden brown
I find that if you will be using hot dogs, it is better to cut the wiener in half so that it is the perfect snack/appetizer size!


    The ones for the party!

    Wednesday, August 3, 2011

    Raspberry Chipotle Flat Chicken


    Hello all! I have been away to Montana since the last time I posted and I haven't had time to cook or bake since I got back. My dwelling is undergoing major renovations and that also includes a re-installment of cabinets and the counter top in our kitchen including refinishing and repainting walls and tiles. Before completely demolishing our kitchen, I made this dish using a sauce I bought in Helena, Montana. It's a "Roasted Raspberry and Chipotle Sauce," and though the idea of a fruit and spices usually does not mix well for me, this sauce had me go head-over-heels. I found this beauty at the local Costco Warehouse, sampled on a thin whole grain cracker with brie cheese. I basically melted along with the soft cheese as soon as the morsel was in my mouth. Tangy-sweet with a bit of savoriness from the cheese and cracker, it was a divine bite. What was even more incredible was the little kick of spiciness that rocked all the flavors together. It was f****ing delicious. Back at home with my prized bottle of the sauce, I couldn't wait to try it on the suggested meats (poultry, pork, salmon) and appetizer suggestions.
    This chicken dish is the first time I have used the sauce since I bought it and I loved the color it gave the roasted chicken (as my family gobbled up almost all the bird). I decided to flatten (butterfly) the chicken so that it would be seasoned better, cooked faster and carved better.  To flatten a chicken, all you do is remove the spine and the breast bone (keel bone) so that you can flatten the bird out and have less bones to worry with when carving. When you season, the spices you use will be better penetrated into the meat so that your bird will be seasoned all over rather than just on the skin. Here's a great instructional video with how to butterfly a chicken.

    I dry rubbed my chicken with salt, pepper, and garlic powder (around 1-2 tsp of each) and roasted it at 200-250 degrees Celsius for about 45 minutes in my glass conventional oven* until the skin was semi-golden brown. I then brushed the bird with 2 tbsp of the Raspberry Chipotle and let it roasted for another 5 minutes until the sauce melted right into the chicken and the skin was glossy and golden. I let the bird rest for 15 minutes before carving so that the meat would retain heat and not dry out. I served the chicken with brown rice, pea tips sauteed in garlic and baked zucchini rounds. Our "last supper" before our kitchen's doomsday.

    *butterfly chicken is awesome on the BBQ too so go ahead and preheat your grill to medium-high heat and grill the bird to your liking!


    Saturday, July 16, 2011

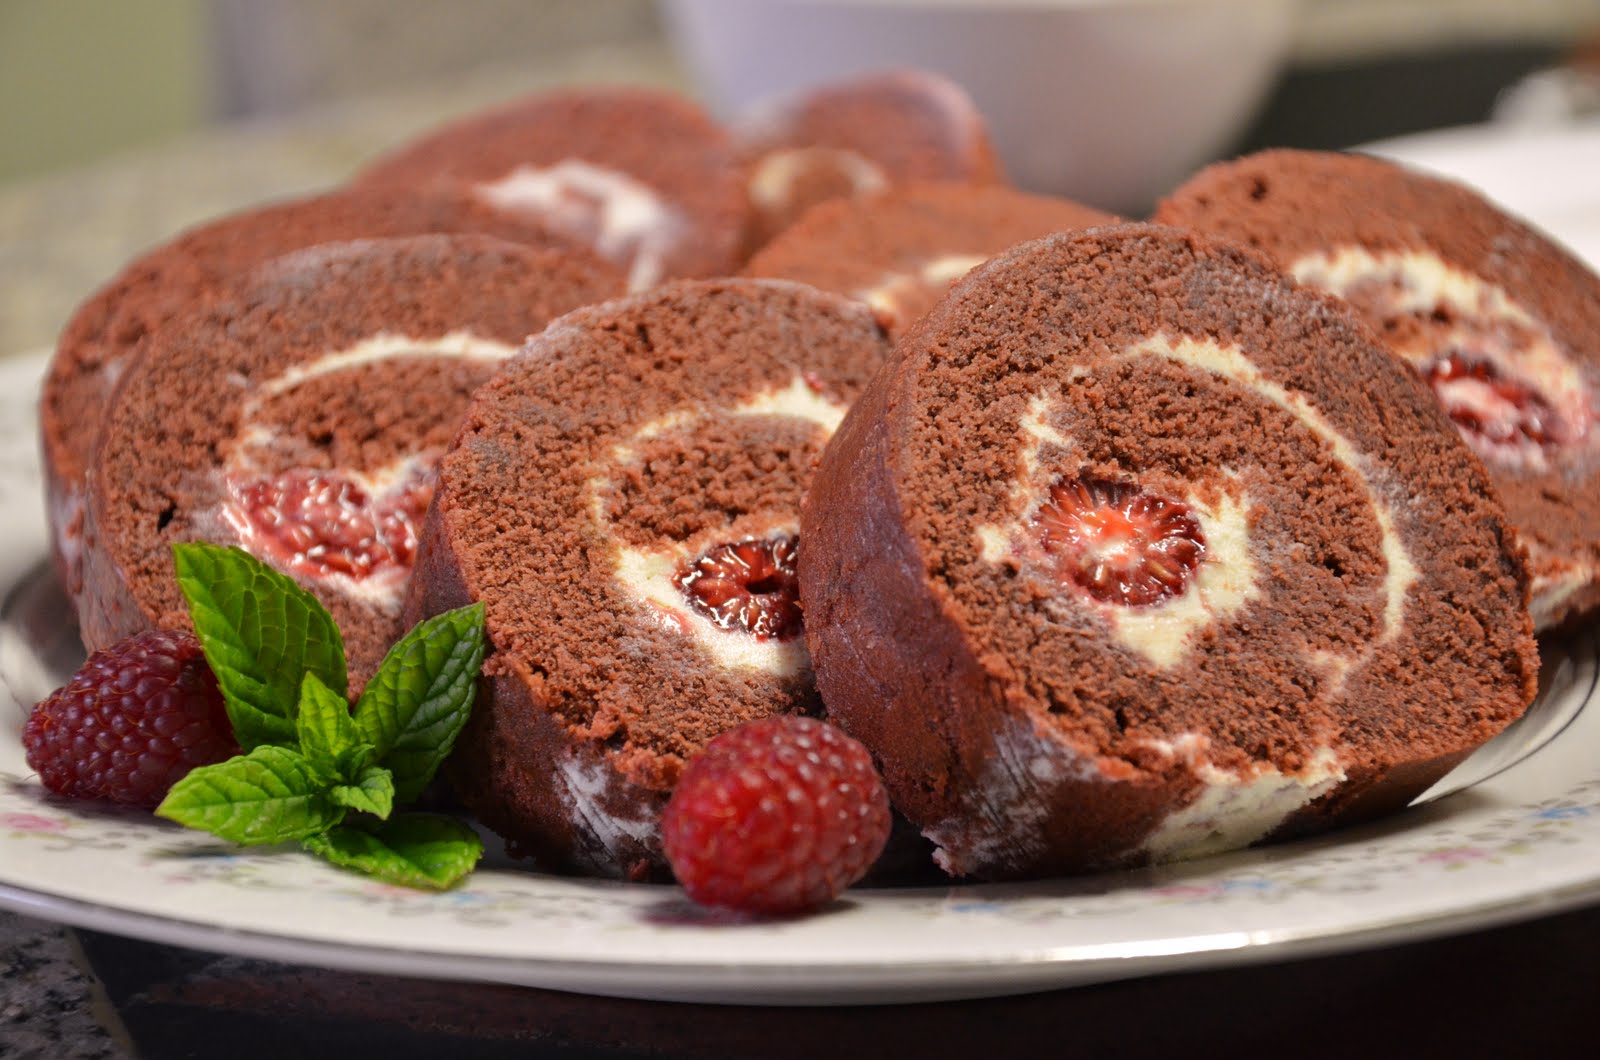
    Red Velvet Cake Roll


    So here is the Red Velvet Roulade Cake that I chilled over night. And all I have to say is, "I flippin' love it!!"

    Recipe Courtesy of Flo Baker

    Red Velvet Cake

    Ingredients

    For the cake
    • 1 cup (4 1/2 ounces) all-purpose flour
    • 2 tablespoons unsweetened natural cocoa powder
    • 1/2 teaspoon baking soda
    • 1/8 teaspoon salt
    • 1/2 cup (4 fluid ounces) milk
    • 1 teaspoon pure vanilla extract
    • 1 teaspoon 1 teaspoon apple cider or white vinegar, 5% acidity*
    • 4 ounces unsalted butter , at room temperature
    • 3/4 cup (5 1/4 ounces) granulated sugar
    • 1 large egg, lightly beaten
    • 1 tablespoon liquid red food coloring (1/2 fluid ounce)
    For the white chocolate–cream cheese
    • One 8-ounce package cream cheese, at room temperature
    • 5 ounces white chocolate, melted
    • 2 ounces unsalted butter, softened
    • 1/3 cup (1 1/4 ounces) powdered sugar, sifted
    • 1 teaspoon pure almond extract
    • 1 cup (4 to 5 ounces) red raspberries, picked over for stems (optional)
    For decoration
    • Powdered sugar for decoration
    • Red raspberries, picked over for stems, for serving

    Directions

    Make the cake
    1. Center a rack in the oven and preheat the oven to 375°F (190°C). Coat a small area in the center of a 15 1/2-by-10 1/2-by-1-inch pan (jelly-roll pan) with nonstick spray. Line the pan with aluminum foil, pressing the foil into the contours of the pan and leaving a 2-inch overhang at each short end (the spray anchors the foil in place to make buttering easier). Butter the foil, then flour it, tapping out the excess flour. Have all of the ingredients at room temperature.
    2. Sift together the flour, cocoa, baking soda, and salt onto a sheet of waxed paper; set aside. In a small bowl, stir together the milk, vanilla, and apple cider. In the bowl of a stand mixer fitted with the paddle attachment, beat the butter on medium-low speed until creamy and smooth, about 1 minute. Increase the speed to medium and add the granulated sugar in a steady stream. Continue to beat until light in color and fluffy in texture, about 2 minutes, stopping the mixer occasionally to scrape down the sides of the bowl.
    3. With the mixer on medium speed, add the egg slowly, about 1 tablespoon at a time, beating after each addition until incorporated and stopping the mixer occasionally to scrape down the sides of the bowl. On the lowest speed, add the flour mixture in two or three additions alternately with the milk mixture in one or two additions, beginning and ending with the flour mixture and mixing after each addition only until incorporated smoothly. Stop the mixer after each addition and scrape down the sides of the bowl. Maintaining the same speed, add the food coloring and mix well to color the batter evenly. Without delay, spoon the batter into the prepared pan, spreading evenly with a rubber spatula.
    4. Bake the cake until it is set on top and springs back when lightly pressed in the center, about 10 minutes. Transfer the pan to a wire rack. If necessary, run a thin knife blade around the perimeter of the pan to loosen the cake sides. Then pull up on the foil overhang and carefully transfer the cake to a wire rack. Without delay, place a sheet of foil over the cake and manipulate the foil to make a shallow tent (a tent holds in the moisture as the cake cools, but prevents the foil from sticking to the cake). Let cool for about 45 minutes, then proceed to assemble the dessert.
    Make the white chocolate–cream cheese filling
    5. In a bowl of the stand mixer fitted with the paddle attachment, beat the cream cheese on medium-low speed until smooth. Pour in half of the chocolate and beat until smooth, stopping the mixer occasionally and scraping the mixture clinging to the sides into the center of the bowl. Pour in the remaining chocolate and beat just until combined. Add the butter and then the sugar and almond extract and beat until smooth and creamy. Use right away, or store in a covered container in the refrigerator. When ready to use, remove from the refrigerator, bring to room temperature, and beat with a rubber spatula, small whisk, or fork until smooth and creamy. You should have about 1 1/3 cups.
    Assemble the cake
    6. Remove the foil from the top of the cake. Transfer the cake on its bottom sheet of foil to a work surface, placing it so that one of its long sides is parallel to the edge of the surface closest to you. Place another long sheet of aluminum foil on the work surface nearby.
    7. Using an offset spatula, spread 1 cup plus about 2 tablespoons of the filling evenly over the cake, leaving a 1/2-inch border uncovered on the long side farthest from you. (The leftover filling, along with a few berries, makes a good kitchen snack for the baker.) Place the raspberries, if using, randomly on the filling along the length of the cake.
    8. Begin rolling the cake by flipping the edge nearest you over onto itself. Then, with the aid of the foil that extends beyond the short sides, roll up the cake lengthwise until you reach the far long side. As you work, wrap the foil around the roll to assist in rounding the shape (otherwise the cake will stick to your hands). To insure the roll is uniform, place the roll in its foil across the bottom third of a 24-inch-long piece of parchment paper, bring the top edge of the paper toward you, and drape it over the cake roll, allowing a 2-inch overhang.
    9. Place the edge of a rimless baking sheet at a 45-degree angle to the roll and your work surface. Apply pressure against the roll, trapping the 2-inch overhang, and push while simultaneously pulling the bottom portion of paper toward you. This push-pull motion creates a resistance that results in compressing the log into a uniform shape. If any cracks appeared as you rolled the cake, they are consolidated in this compression and disappear from view.
    10. Carefully lift the roll in the aluminum foil and set it, seam side down, on the fresh sheet of foil. Wrap the cake securely in the foil. Transfer the foil-wrapped roll to the baking sheet or shallow tray and refrigerate for about 30 minutes to help set the filling.
    To serve
    11. Remove the cake from the refrigerator and peel off and discard the foil. Carefully lift the roll onto a serving plate with the aid of a long, wide spatula or a rimless baking sheet. (If not serving right away, cover loosely with plastic wrap to keep the cake’s surface from drying out and return to the refrigerator to serve the same day.) Dust the cake with powdered sugar. Using a serrated knife and a sawing motion, cut the roll into 1/2-inch-thick slices. Center each portion on a dessert plate. Accompany with the raspberries.

    *Instead of using apple cider or vinegar, I used  raspberry vinegar that added an awesome kick to the cake and a fruity aroma to the cocoa. Yum yum!


    Friday, July 15, 2011

    Red Velvet Cupcakes with White Chocolate Topping


    Okay...if Heaven was a cupcake, then I must have died at least 5 times. This must be one of the best red velvet cake recipes I have ever tried and the white chocolate-cream cheese topping is absolutely glorious! Topped with fresh raspberries, I felt so guilty but soooo pleased. The recipe itself is used to make a cake roll but I accidentally doubled the butter so I had to double everything else (clumsy me). I had enough for a roll and several mini cupcakes. The redness in my batter was less vibrant because I used a red gel rather than the liquid food coloring so I couldn't really estimate how much I needed but I love it nonetheless.
    The cake roll required refrigeration time so I will post the results tomorrow. This would be my first time making a cake roulade...let's hope it's not a disaster? I will post the recipe of the roll and red velvet batter in the Red Velvet Cake Roll post.

    Sunday, September 26, 2010

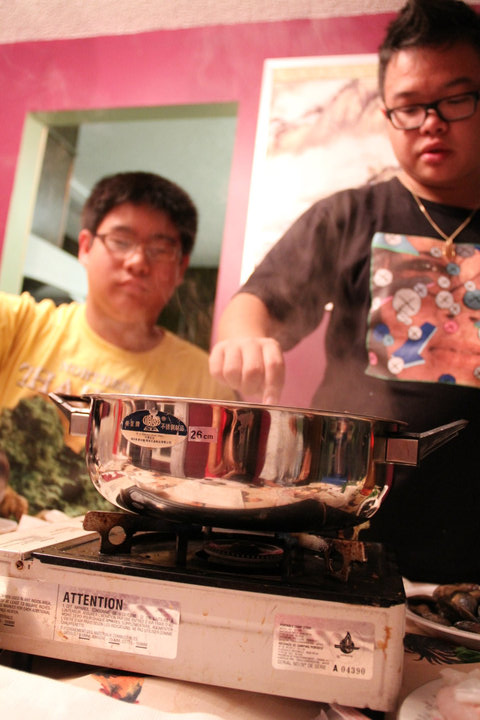
    Family Hotpot Night

    One of our  Hotpots
    So last week, my family and I had a big hotpot night and it was so much fun!! Hotpot is basically a "Chinese Fondue" where a pot of simmering stock is located in the center of the dining table and members/guests add in meats or vegetables to cook. It's a great experience that allows family members to converse while they wait for the food to cook. Since we are a big family, we had three hotpots on three gas burners going (except I got my own pot because I am a vegetarian.) My family are huge seafood fans so most of our options were fish and shellfishes. We had many different vegetables such as pea sprouts, Chinese celery,spinach, enoki and king oyster mushrooms; and taro roots. We had beef and lamb slices; eggs, shrimp, squid and mussels; king cod fillets, lobster and shrimp balls. My vegetarian choices included, the vegetables, eggs, mushrooms, tofu, veggie balls, and veggie crab sticks as well as veggie sausages and fish cakes. Oh, and to accompany all the other ingredients are udon noodles, buckwheat noodles, egg noodles, wonton noodles and rice noodles. So here are some pics of that fun night, photographs taken by my cousin.
    The Family
    Buckwheat noodles and Meat
    Vegetables and Seafood

    Seafood
    Cooked Seafood Udon with Egg

    Family
    My Veggie Hot pot
    My Veggie Stuff

    My Cousin and me poaching an egg
    My brother (in the yellow) and Cousin
    My cousin and my mom in background

    Wednesday, September 8, 2010

    Wall of Vegetarians

    The 14th Dalai Lama (1935-present)

     I was just browsing around the internet, researching up Sir Ian McKellen when I stumbled upon the fact that he is a vegetarian. So I decided to make a small tribute to all the self-proclaimed vegetarians from our past and present, no matter who they identified themselves as; gay, smart, evil or just plain talented. I know being a vegetarian may not seem like a big deal to some people but believe it or not, it becomes quite exhausting and life changing- especially when you are surrounded with family or friends who consume meat and/or have a hard time understanding vegetarianism. The following figures have their own personal reasons for being a vegetarian and I believe we must respect their choice and vegetarian lifestyle, no matter what their reputation was or is. (Note: Some of these figures may be very controversial and as much as I respect your opinion/views, I must ask that you do not comment with hate or 'bash' any of these figures. Thank-you)

    Voltaire, philospoher (1694-1778)
    Leonardo da Vinci  (1452-1519)(1452-04-15)

    Albert Einstein, genius(1879-1955) (1879-03-14)
                             
    Gandhi,spiritual leader (1869-1948) (1869-10-02)
    Lord Byron, poet (1788-1824)(1788-01-22)

    Adolf Hitler, dictator (1889-1945)
    Shania Twain, singer(1965-present)(1965-08-2
    Jim Carrey, actor (1962-present) (1962-01-17)


    Sir Ian McKellen, actor (1939-present) (1939-05-25)


    Portia de Rossi, actress(1973-present) (1973-01-31-presn-
    Ellen DeGeneres (1958-present) (1958-01-26)


    Tobey Maguire, actor (1975-present)(1975-06-27-present
    Anne Hathaway (1982-present) (1982-11-12)


    Mr. Fred Rogers, TV host (1928-2003)


    k.d lang,singer(1961-present)(1961-11-02)
    Paul McCartney, musician (1942-present) (1942-06-18)


    Rob Zombie (1965-present)(1965-01-12-
    k-os, singer (1972-present) (1972-02-20


    Michael Jackson, King of Pop (1958-2009) (1958-08-29)