Showing posts with label chocolate. Show all posts

Monday, November 14, 2011

Somalia Charity Bake Sale


I'm part of a Sociology club at my university and we joined another club to help fund raise for the Somalia Famine. Most of us fasted while other managed a bake sale. My contribution was 3 dozen Somalia-themed cupcakes, in vanilla and chocolate flavors (blue cupcake is just vanilla with blue food coloring) with good-ol' buttercream icing. For the blue tints in the icing, I used a duo-tone swirl technique for the blue swirls and the dollop of icing I sprayed with blue cake graffiti spray by Duff. The stars where homemade by piping out stars with melted white chocolate on parchment paper.
We raised a total of $750 sum over the course of three days for the bake sale.
It was rad!
The Somalia Flag


With a little of batter left over, I made mini cupcakes! <3

Sunday, August 28, 2011

Oreo and Chocolate Chip Cookie Brownies


I came across this idea somewhere on the web but never got a chance to try it out until now. It's simply a very sweet and fudgey, brownie with a chocolate chip cookie base and oreo cookies in the center. I must say that this must be the sweetest dessert that i have every made, so sweet that I decided to cut it into small morsels, something like fudge cubes. I made these morsels for a farewell, campfire party for my best-est friend, who is moving to another province. I'm glad she and her guests enoughed this insanely sweet treat.


Saturday, July 16, 2011

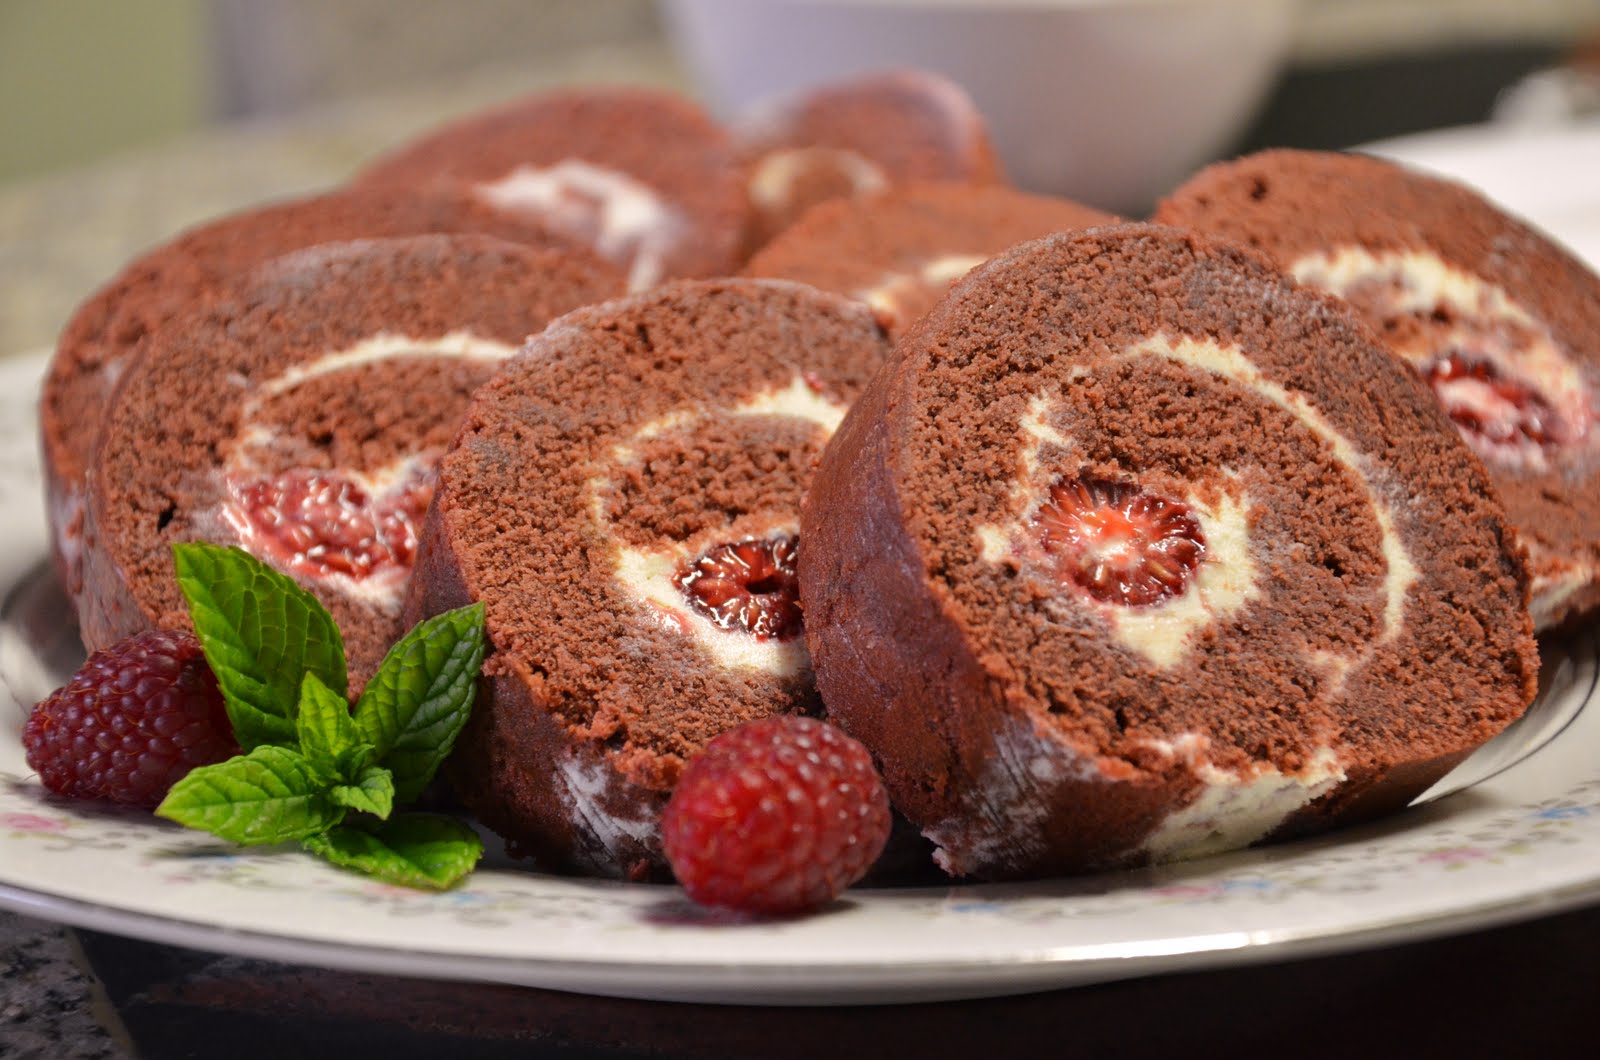
Red Velvet Cake Roll


So here is the Red Velvet Roulade Cake that I chilled over night. And all I have to say is, "I flippin' love it!!"

Recipe Courtesy of Flo Baker

Red Velvet Cake

Ingredients

For the cake
  • 1 cup (4 1/2 ounces) all-purpose flour
  • 2 tablespoons unsweetened natural cocoa powder
  • 1/2 teaspoon baking soda
  • 1/8 teaspoon salt
  • 1/2 cup (4 fluid ounces) milk
  • 1 teaspoon pure vanilla extract
  • 1 teaspoon 1 teaspoon apple cider or white vinegar, 5% acidity*
  • 4 ounces unsalted butter , at room temperature
  • 3/4 cup (5 1/4 ounces) granulated sugar
  • 1 large egg, lightly beaten
  • 1 tablespoon liquid red food coloring (1/2 fluid ounce)
For the white chocolate–cream cheese
  • One 8-ounce package cream cheese, at room temperature
  • 5 ounces white chocolate, melted
  • 2 ounces unsalted butter, softened
  • 1/3 cup (1 1/4 ounces) powdered sugar, sifted
  • 1 teaspoon pure almond extract
  • 1 cup (4 to 5 ounces) red raspberries, picked over for stems (optional)
For decoration
  • Powdered sugar for decoration
  • Red raspberries, picked over for stems, for serving

Directions

Make the cake
1. Center a rack in the oven and preheat the oven to 375°F (190°C). Coat a small area in the center of a 15 1/2-by-10 1/2-by-1-inch pan (jelly-roll pan) with nonstick spray. Line the pan with aluminum foil, pressing the foil into the contours of the pan and leaving a 2-inch overhang at each short end (the spray anchors the foil in place to make buttering easier). Butter the foil, then flour it, tapping out the excess flour. Have all of the ingredients at room temperature.
2. Sift together the flour, cocoa, baking soda, and salt onto a sheet of waxed paper; set aside. In a small bowl, stir together the milk, vanilla, and apple cider. In the bowl of a stand mixer fitted with the paddle attachment, beat the butter on medium-low speed until creamy and smooth, about 1 minute. Increase the speed to medium and add the granulated sugar in a steady stream. Continue to beat until light in color and fluffy in texture, about 2 minutes, stopping the mixer occasionally to scrape down the sides of the bowl.
3. With the mixer on medium speed, add the egg slowly, about 1 tablespoon at a time, beating after each addition until incorporated and stopping the mixer occasionally to scrape down the sides of the bowl. On the lowest speed, add the flour mixture in two or three additions alternately with the milk mixture in one or two additions, beginning and ending with the flour mixture and mixing after each addition only until incorporated smoothly. Stop the mixer after each addition and scrape down the sides of the bowl. Maintaining the same speed, add the food coloring and mix well to color the batter evenly. Without delay, spoon the batter into the prepared pan, spreading evenly with a rubber spatula.
4. Bake the cake until it is set on top and springs back when lightly pressed in the center, about 10 minutes. Transfer the pan to a wire rack. If necessary, run a thin knife blade around the perimeter of the pan to loosen the cake sides. Then pull up on the foil overhang and carefully transfer the cake to a wire rack. Without delay, place a sheet of foil over the cake and manipulate the foil to make a shallow tent (a tent holds in the moisture as the cake cools, but prevents the foil from sticking to the cake). Let cool for about 45 minutes, then proceed to assemble the dessert.
Make the white chocolate–cream cheese filling
5. In a bowl of the stand mixer fitted with the paddle attachment, beat the cream cheese on medium-low speed until smooth. Pour in half of the chocolate and beat until smooth, stopping the mixer occasionally and scraping the mixture clinging to the sides into the center of the bowl. Pour in the remaining chocolate and beat just until combined. Add the butter and then the sugar and almond extract and beat until smooth and creamy. Use right away, or store in a covered container in the refrigerator. When ready to use, remove from the refrigerator, bring to room temperature, and beat with a rubber spatula, small whisk, or fork until smooth and creamy. You should have about 1 1/3 cups.
Assemble the cake
6. Remove the foil from the top of the cake. Transfer the cake on its bottom sheet of foil to a work surface, placing it so that one of its long sides is parallel to the edge of the surface closest to you. Place another long sheet of aluminum foil on the work surface nearby.
7. Using an offset spatula, spread 1 cup plus about 2 tablespoons of the filling evenly over the cake, leaving a 1/2-inch border uncovered on the long side farthest from you. (The leftover filling, along with a few berries, makes a good kitchen snack for the baker.) Place the raspberries, if using, randomly on the filling along the length of the cake.
8. Begin rolling the cake by flipping the edge nearest you over onto itself. Then, with the aid of the foil that extends beyond the short sides, roll up the cake lengthwise until you reach the far long side. As you work, wrap the foil around the roll to assist in rounding the shape (otherwise the cake will stick to your hands). To insure the roll is uniform, place the roll in its foil across the bottom third of a 24-inch-long piece of parchment paper, bring the top edge of the paper toward you, and drape it over the cake roll, allowing a 2-inch overhang.
9. Place the edge of a rimless baking sheet at a 45-degree angle to the roll and your work surface. Apply pressure against the roll, trapping the 2-inch overhang, and push while simultaneously pulling the bottom portion of paper toward you. This push-pull motion creates a resistance that results in compressing the log into a uniform shape. If any cracks appeared as you rolled the cake, they are consolidated in this compression and disappear from view.
10. Carefully lift the roll in the aluminum foil and set it, seam side down, on the fresh sheet of foil. Wrap the cake securely in the foil. Transfer the foil-wrapped roll to the baking sheet or shallow tray and refrigerate for about 30 minutes to help set the filling.
To serve
11. Remove the cake from the refrigerator and peel off and discard the foil. Carefully lift the roll onto a serving plate with the aid of a long, wide spatula or a rimless baking sheet. (If not serving right away, cover loosely with plastic wrap to keep the cake’s surface from drying out and return to the refrigerator to serve the same day.) Dust the cake with powdered sugar. Using a serrated knife and a sawing motion, cut the roll into 1/2-inch-thick slices. Center each portion on a dessert plate. Accompany with the raspberries.

*Instead of using apple cider or vinegar, I used  raspberry vinegar that added an awesome kick to the cake and a fruity aroma to the cocoa. Yum yum!


Friday, July 15, 2011

Red Velvet Cupcakes with White Chocolate Topping


Okay...if Heaven was a cupcake, then I must have died at least 5 times. This must be one of the best red velvet cake recipes I have ever tried and the white chocolate-cream cheese topping is absolutely glorious! Topped with fresh raspberries, I felt so guilty but soooo pleased. The recipe itself is used to make a cake roll but I accidentally doubled the butter so I had to double everything else (clumsy me). I had enough for a roll and several mini cupcakes. The redness in my batter was less vibrant because I used a red gel rather than the liquid food coloring so I couldn't really estimate how much I needed but I love it nonetheless.
The cake roll required refrigeration time so I will post the results tomorrow. This would be my first time making a cake roulade...let's hope it's not a disaster? I will post the recipe of the roll and red velvet batter in the Red Velvet Cake Roll post.

Thursday, June 23, 2011

124 Decorated Chai Elephants


One elephant, two elephant, three elephant...
A co-worker of mine placed an order for 124 elephant cookies, made with my shortbread cookie base, flavoured with Masala Chai spice (cinnamon, cardamom, ginger, cloves and black pepper). The cookies were outlined and covered with melted white chocolate, similar to the process of flow icing. I opted for the chocolate because it is less sweet than flow icing and it goes smoothly with the shortbread. The red accents are drawn on with red candy melts s and accented with edible red shimmer. Gold touches are painted on with edible gold paint and golden sugar balls. Ears, toes and darker detailing are drawn on using melted cinnamon chips. The entire order took me around 24+ hours to complete. 100 cookies acted as party favors at a 25th wedding anniversary, 1 dozen were used as a gift with a complimentary best wishes heart to couple and 1 dozen were for personal enjoyment.
I'll be dreaming of elephants for the next little while lol.


Woooo! Elephants all around!
Me, packaging lol
Individually Packaged
The dozen being gifted with heart piece.
My mom's wonderful job, cause I suck at ruffle wrapping


Saturday, June 18, 2011

Totoro Cream Puffs


I had a major craving for cream puffs last night, so I whipped up some choux pastry and got a little creative. I piped the choux pastry into Totoro-shaped puffs and then added chocolate eyes and detailing after it cooled. The inspiration grew from a web-search I did several years back, whereas a fellow foodie did the exact same concept. Totoro is one of my most favorite characters from Japanese Animation; he stars in the film "My Neighbor Totoro" by the talented Hayao Miyazaki. He is known as the "keeper of the forest" appearing as a creature crossed between a raccoon, an owl and a rabbit.
Oh, and I used vanilla pastry cream as the filling.


Thursday, June 9, 2011

Rainbow Cupcakes


This is not the first time I've made these kind of cupcakes but I've never been able to take pictures of them because they always disappeared before I had a chance. These cupcakes were made for a student meeting I was suppose to attend but alas, the date changed at the last minute so I had two batches left over. Luckily, I have a family gathering coming up this weekend so these darlings won't have to go to waste. I seldom make cupcakes at home for indulgence but it's one of my favorite things to bring along to gatherings and parties.
The technique is very easy but a little time consuming to do. I mixed up some cake batter from scratch (you can use vanilla cake batter from a  box if you want) and divided the batter into 6 bowls. I mixed each bowl a different color and after lining up my cupcake pan, I spooned a small amount of purple, then a small amount of green, etc, until I finished with red. Follow the baking instructions on the box or whatever recipe of cake you are using, and voila.These cupcakes are layered with six colors of the rainbow and topped with a light homemade whipped topping. I sprinkled some rainbow chocolate chips on for extra color and sweetness since these cupcakes are not too sweet but are very light and delicate.


Saturday, February 26, 2011

Pixel Cookies: Link from Zelda


I like to challenge myself. And when I do, I challenge myself to the extreme. I have come across "pixel" cookies a long time ago but I never got around to actually trying it out. "Pixel" cookies are basically shortbread cookie dough, cut/pressed into strips and are painstakingly put together into a log or rectangle which is then sliced into cookies to form an image of a pix-elated picture. I finally got my patience and confidence up after watching a video my brother showed me. So after trying to find an image or character, with intense research (by intense I mean sitting in my bed and typing in "pixel cookies" or "pixel characters" on Google lol), I came across a Link pixel cookie. I have always enjoyed making Zelda themed items (birthday cards, crafts and the such), so I made a decision on Link. But I wanted it to be different and I guess, unique (as can be), thus I came across a pixel Link painting on deviantArt and decided to use that as my reference.
Something you should know about me, is that I HATE math. I am absolutely HORRIBLE at it. Thus, I have never done so much "math" in my life, especially with a cookie. I needed to know how many "pixels" were in the image, plus figure out how many colors I needed and how much of each color; and what size I wanted the entire cookie to be was important also. It seemed like forever but I managed to somewhat figure it all out.
The cookie probably took me 12+ hours all together to assemble, minus baking time and chilling time (30 mins). The cookies were around 3 inches x 3.5 inches and are FLAVORED! Pandan (green) and coco-vanilla (white) flavored. Why? Cause I'm a cool Asian.
The recipe for the shortbread is somewhat "my" recipe. For a simpler and still delish recipe, the recipe that my friend and I used for our shark cookies is awesome too.

If you don't have the time or the patience to make these, you can purchase a made-to-order dozen here at my cookie shop.
(If you mention that you came across my blog, I'll give you a bakers' dozen.)

Buttery Shortbread Cookies

For 3 dozen:

2 cups flour
1 cup Corn Starch
1 cup icing sugar
1 1/2 cup butter, softened
2 tsp vanilla

1. In a large bowl, combine flour, corn starch and icing sugar. Blend in softened butter with a wooden spoon then knead with hands until a soft, smooth dough forms. Divide dough into desired portions and work in desired colors.
2.Do whatever your heart desires.
3. Preheat oven to 350 degrees Fahrenheit (180 degrees Celsius). Bake for 10-12 minutes or until edges are just starting to turn brown. Cool 10 mins on sheets then remove onto a rack and cool completely.

The log-rectangle thing!...before cutting

Ready to bake!!
BAKED!!

Sunday, February 13, 2011

Pink Pancakes: Stacks of Love


Happy day-early Valentine's Day to those who are luckily in love or those who celebrate this "holiday." This year I am single but that doesn't mean I can't share a bit of my love.
This irresistibly sweet stack of love is perfectly fit for this occasion. Pink Pancakes studded with chocolate chips, stacked between layers of Smuckers strawberry jam, smothered with bittersweet chocolate sauce and topped with a dollop of whipped cream and pink mint and chocolate chips. Can you feel the love yet?