Showing posts with label sex. Show all posts

Wednesday, August 3, 2011

Raspberry Chipotle Flat Chicken


Hello all! I have been away to Montana since the last time I posted and I haven't had time to cook or bake since I got back. My dwelling is undergoing major renovations and that also includes a re-installment of cabinets and the counter top in our kitchen including refinishing and repainting walls and tiles. Before completely demolishing our kitchen, I made this dish using a sauce I bought in Helena, Montana. It's a "Roasted Raspberry and Chipotle Sauce," and though the idea of a fruit and spices usually does not mix well for me, this sauce had me go head-over-heels. I found this beauty at the local Costco Warehouse, sampled on a thin whole grain cracker with brie cheese. I basically melted along with the soft cheese as soon as the morsel was in my mouth. Tangy-sweet with a bit of savoriness from the cheese and cracker, it was a divine bite. What was even more incredible was the little kick of spiciness that rocked all the flavors together. It was f****ing delicious. Back at home with my prized bottle of the sauce, I couldn't wait to try it on the suggested meats (poultry, pork, salmon) and appetizer suggestions.
This chicken dish is the first time I have used the sauce since I bought it and I loved the color it gave the roasted chicken (as my family gobbled up almost all the bird). I decided to flatten (butterfly) the chicken so that it would be seasoned better, cooked faster and carved better.  To flatten a chicken, all you do is remove the spine and the breast bone (keel bone) so that you can flatten the bird out and have less bones to worry with when carving. When you season, the spices you use will be better penetrated into the meat so that your bird will be seasoned all over rather than just on the skin. Here's a great instructional video with how to butterfly a chicken.

I dry rubbed my chicken with salt, pepper, and garlic powder (around 1-2 tsp of each) and roasted it at 200-250 degrees Celsius for about 45 minutes in my glass conventional oven* until the skin was semi-golden brown. I then brushed the bird with 2 tbsp of the Raspberry Chipotle and let it roasted for another 5 minutes until the sauce melted right into the chicken and the skin was glossy and golden. I let the bird rest for 15 minutes before carving so that the meat would retain heat and not dry out. I served the chicken with brown rice, pea tips sauteed in garlic and baked zucchini rounds. Our "last supper" before our kitchen's doomsday.

*butterfly chicken is awesome on the BBQ too so go ahead and preheat your grill to medium-high heat and grill the bird to your liking!


Saturday, July 16, 2011

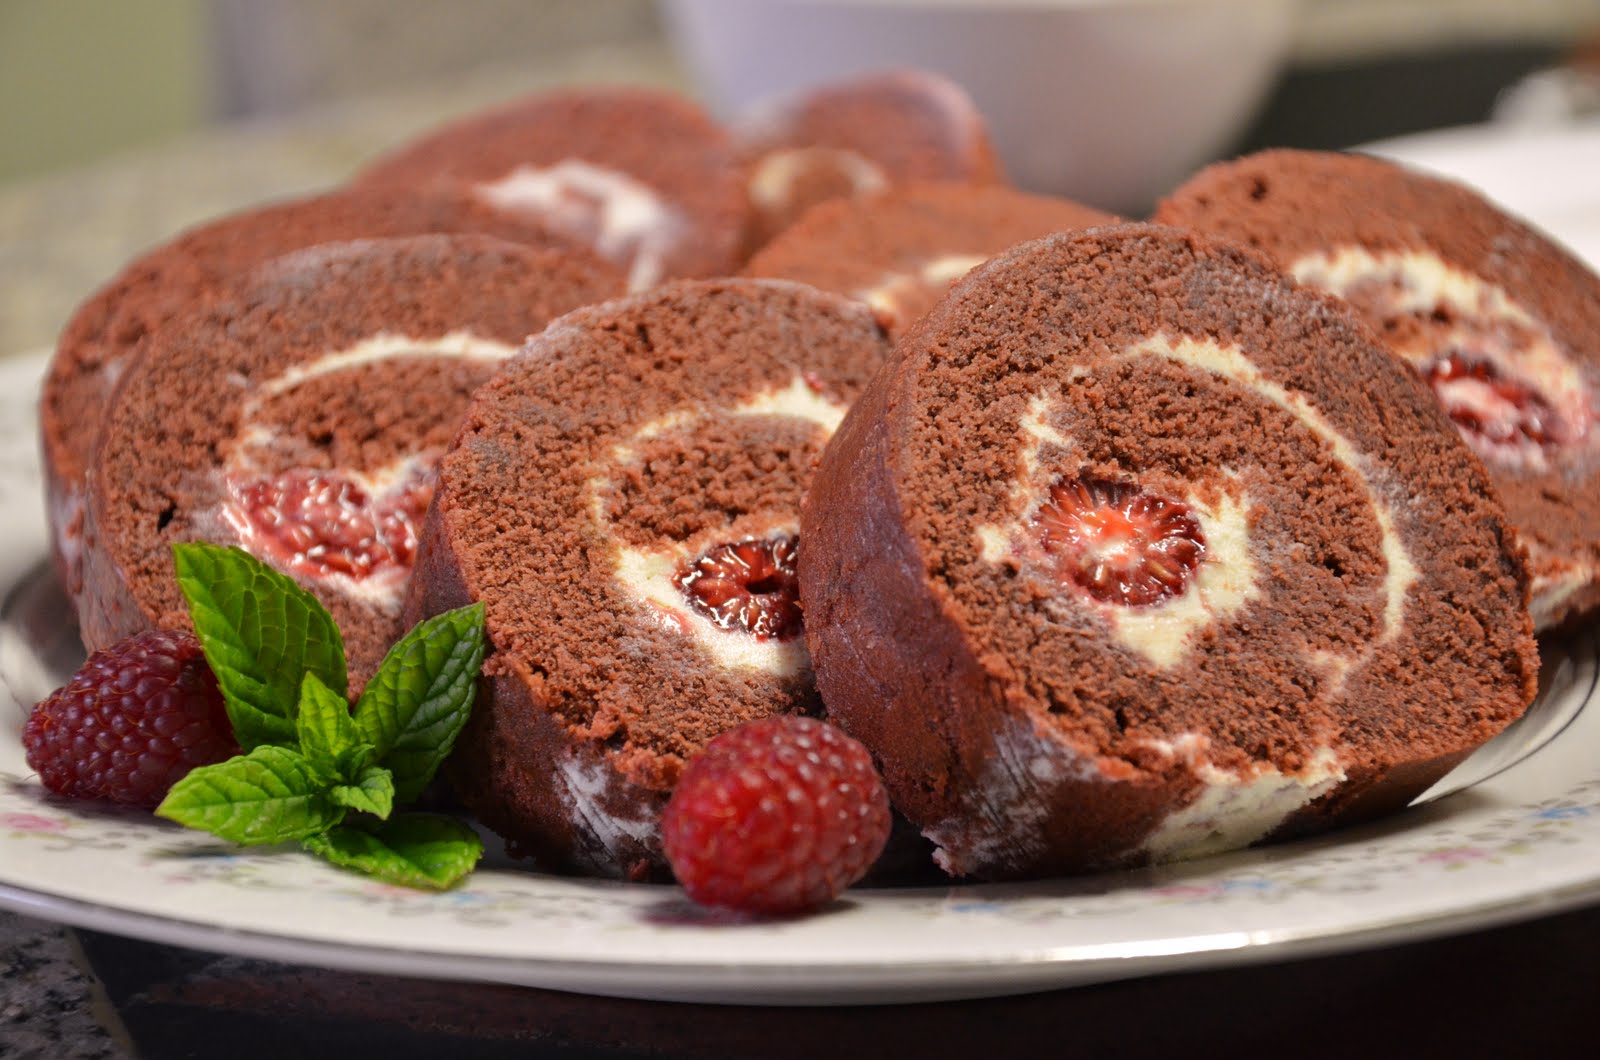
Red Velvet Cake Roll


So here is the Red Velvet Roulade Cake that I chilled over night. And all I have to say is, "I flippin' love it!!"

Recipe Courtesy of Flo Baker

Red Velvet Cake

Ingredients

For the cake
  • 1 cup (4 1/2 ounces) all-purpose flour
  • 2 tablespoons unsweetened natural cocoa powder
  • 1/2 teaspoon baking soda
  • 1/8 teaspoon salt
  • 1/2 cup (4 fluid ounces) milk
  • 1 teaspoon pure vanilla extract
  • 1 teaspoon 1 teaspoon apple cider or white vinegar, 5% acidity*
  • 4 ounces unsalted butter , at room temperature
  • 3/4 cup (5 1/4 ounces) granulated sugar
  • 1 large egg, lightly beaten
  • 1 tablespoon liquid red food coloring (1/2 fluid ounce)
For the white chocolate–cream cheese
  • One 8-ounce package cream cheese, at room temperature
  • 5 ounces white chocolate, melted
  • 2 ounces unsalted butter, softened
  • 1/3 cup (1 1/4 ounces) powdered sugar, sifted
  • 1 teaspoon pure almond extract
  • 1 cup (4 to 5 ounces) red raspberries, picked over for stems (optional)
For decoration
  • Powdered sugar for decoration
  • Red raspberries, picked over for stems, for serving

Directions

Make the cake
1. Center a rack in the oven and preheat the oven to 375°F (190°C). Coat a small area in the center of a 15 1/2-by-10 1/2-by-1-inch pan (jelly-roll pan) with nonstick spray. Line the pan with aluminum foil, pressing the foil into the contours of the pan and leaving a 2-inch overhang at each short end (the spray anchors the foil in place to make buttering easier). Butter the foil, then flour it, tapping out the excess flour. Have all of the ingredients at room temperature.
2. Sift together the flour, cocoa, baking soda, and salt onto a sheet of waxed paper; set aside. In a small bowl, stir together the milk, vanilla, and apple cider. In the bowl of a stand mixer fitted with the paddle attachment, beat the butter on medium-low speed until creamy and smooth, about 1 minute. Increase the speed to medium and add the granulated sugar in a steady stream. Continue to beat until light in color and fluffy in texture, about 2 minutes, stopping the mixer occasionally to scrape down the sides of the bowl.
3. With the mixer on medium speed, add the egg slowly, about 1 tablespoon at a time, beating after each addition until incorporated and stopping the mixer occasionally to scrape down the sides of the bowl. On the lowest speed, add the flour mixture in two or three additions alternately with the milk mixture in one or two additions, beginning and ending with the flour mixture and mixing after each addition only until incorporated smoothly. Stop the mixer after each addition and scrape down the sides of the bowl. Maintaining the same speed, add the food coloring and mix well to color the batter evenly. Without delay, spoon the batter into the prepared pan, spreading evenly with a rubber spatula.
4. Bake the cake until it is set on top and springs back when lightly pressed in the center, about 10 minutes. Transfer the pan to a wire rack. If necessary, run a thin knife blade around the perimeter of the pan to loosen the cake sides. Then pull up on the foil overhang and carefully transfer the cake to a wire rack. Without delay, place a sheet of foil over the cake and manipulate the foil to make a shallow tent (a tent holds in the moisture as the cake cools, but prevents the foil from sticking to the cake). Let cool for about 45 minutes, then proceed to assemble the dessert.
Make the white chocolate–cream cheese filling
5. In a bowl of the stand mixer fitted with the paddle attachment, beat the cream cheese on medium-low speed until smooth. Pour in half of the chocolate and beat until smooth, stopping the mixer occasionally and scraping the mixture clinging to the sides into the center of the bowl. Pour in the remaining chocolate and beat just until combined. Add the butter and then the sugar and almond extract and beat until smooth and creamy. Use right away, or store in a covered container in the refrigerator. When ready to use, remove from the refrigerator, bring to room temperature, and beat with a rubber spatula, small whisk, or fork until smooth and creamy. You should have about 1 1/3 cups.
Assemble the cake
6. Remove the foil from the top of the cake. Transfer the cake on its bottom sheet of foil to a work surface, placing it so that one of its long sides is parallel to the edge of the surface closest to you. Place another long sheet of aluminum foil on the work surface nearby.
7. Using an offset spatula, spread 1 cup plus about 2 tablespoons of the filling evenly over the cake, leaving a 1/2-inch border uncovered on the long side farthest from you. (The leftover filling, along with a few berries, makes a good kitchen snack for the baker.) Place the raspberries, if using, randomly on the filling along the length of the cake.
8. Begin rolling the cake by flipping the edge nearest you over onto itself. Then, with the aid of the foil that extends beyond the short sides, roll up the cake lengthwise until you reach the far long side. As you work, wrap the foil around the roll to assist in rounding the shape (otherwise the cake will stick to your hands). To insure the roll is uniform, place the roll in its foil across the bottom third of a 24-inch-long piece of parchment paper, bring the top edge of the paper toward you, and drape it over the cake roll, allowing a 2-inch overhang.
9. Place the edge of a rimless baking sheet at a 45-degree angle to the roll and your work surface. Apply pressure against the roll, trapping the 2-inch overhang, and push while simultaneously pulling the bottom portion of paper toward you. This push-pull motion creates a resistance that results in compressing the log into a uniform shape. If any cracks appeared as you rolled the cake, they are consolidated in this compression and disappear from view.
10. Carefully lift the roll in the aluminum foil and set it, seam side down, on the fresh sheet of foil. Wrap the cake securely in the foil. Transfer the foil-wrapped roll to the baking sheet or shallow tray and refrigerate for about 30 minutes to help set the filling.
To serve
11. Remove the cake from the refrigerator and peel off and discard the foil. Carefully lift the roll onto a serving plate with the aid of a long, wide spatula or a rimless baking sheet. (If not serving right away, cover loosely with plastic wrap to keep the cake’s surface from drying out and return to the refrigerator to serve the same day.) Dust the cake with powdered sugar. Using a serrated knife and a sawing motion, cut the roll into 1/2-inch-thick slices. Center each portion on a dessert plate. Accompany with the raspberries.

*Instead of using apple cider or vinegar, I used  raspberry vinegar that added an awesome kick to the cake and a fruity aroma to the cocoa. Yum yum!


Monday, May 30, 2011

BBQ Day 3


Day 3 of working the grill and I wanted to try something new. Courtesy of Kraft Mag (again), I wanted to try roasting a bird on a beer can. The whole idea is to have the bird sitting upright on a half-drunken can of beer and cook the bird on medium-low heat for about an hour until tender and juicy. The remaining beer in the can would gently steam the bird from the inside while the outer flames cooked the dry-rubbed skin. Instead of following the exact recipe from Kraft, I dry-rubbed mine with Asian five-spice, salt, pepper and paprika after rubbing the whole bird with fresh lemon. I chose to pair the poultry dish with some new potatoes, peeled and tossed in the good stuff: olive oil, salt, pepper, and some sliced sweet onion. Other sides included corn on the cob, unpeeled because I wanted to retain as much of the juices as I could; yellow sweet potatoes, mushrooms, and cassava. I also fired up the left over burgers from yesterday.
One big setback resulted from my stupidity as I forgot to turn off the heat directly below the bird, so bubbling alcohol and chicken fat engulfed the bird in flames. The skin was burnt to a black abyss but the meat remained really juicy and because I pierced small holes into the bird when I dry-rubbed it, the flavor wasn't lost when the skin burnt. Cooking time divided in half but that bird looked darn ugly and I was so flustered I forgot to take a pic of the bird before it was served. Oh well, I'll definitely learn from this mistake and I'll be less inattentive next time.


The good stuff
-ahem- This does not look wrong.
The newly weds!

Smokin'

Corn on the cob

Mussshhhhrooms!

Burgers.

Potatoes!

The only pic of the cooked chicken that I took.

Wednesday, February 16, 2011

Caramel Flan

Caramel Flan with Spun Sugar


I am a flan lover. I LOVE flan. It's basically a custard dish that is baked using the Bain-Marie or water bath technique. I have always thought it would be difficult to make so I always buy the ready-made flan at my local Asian Market. Today, I finally decided to make it after doing a lot of research on recipes, variations and techniques. I found a simple recipe/method on YouTube and so here is my first attempt EVER, at making flan. AND IT WAS A SUCCESS!!
I made the basic caramel flavor and it was awesome. I also tried my hand at spun sugar, which was a bit of a hassle since it was also my first time and I didn't have enough patience to properly set up an area to "spin" the sugar. I burnt one finger because I forgot how hot the sugar syrup would be...silly me.
Recipe for the flan is written below.

Caramel Crust:
In a saucepan, melt around 3/4 cup sugar on medium heat until liquefied and caramel in color. Pour a thin layer into ramekins or custard cups. Set aside.

Custard:

3 eggs
50 grams sugar
1 tsp vanilla extract/essence
500ml milk

In a bowl, gently whisk eggs and sugar together until sugar is dissolved. Add in vanilla extract and milk. Strain into a large measuring cup to remove the egg white strands and skim off any froth that is visible.
Pour mixture into ramekins, leaving 1 cm space between mixture and rim. Place ramekins in a roasting pan or double broiler and fill pan half way up with boiling water.
Preheat oven to 200 degrees Celsius and bake for 45 minutes until set. Remove and let cool on a rack for 10 minutes before placing into the fridge to chill for 4 hours. 
Loosen sides and flip onto a  plate (you may have to tap or shake it a bit for it to slide out).
Garnish with whatever you like or just serve plain. 

SO RICH, SMOOTH AND CREAMY!! IT TASTES LIKE BLISS IN HEAVEN!

Sunday, August 29, 2010

Pleasurably Blissful Apple Cheesecake

Arousingly Deliscious!
Apple Cheesecake = Sex on a plate.
I am serious. After coming home from my vacation to Vietnam, I craved that delicious and delicate dessert that was served with my flight meal, thus I told myself I would make it at home in my own kitchen. And I did!!
This is my first ever cheesecake. I had always shied away from making homemade cheesecake because the one time I ate homemade "cheesecake," it was not a pleasant experience.
So, after picking fresh apples from my apple tree and slave driving my best friend to peel them for me (lol just kidding) while I sliced, we (the fantastic duo) candied the apples, beat the cream cheese and crushed the graham crackers to great a stunning, smexy cake, drizzled with a creamy maple butter sauce. Doesn't that just turn you on? haha ;)

Apple Cheesecake

Crust
22 graham crackers, crushed
1/4 cup melted butter

Slowly add in the melted butter with the graham and mix until well blended.
Press onto the bottom of a springform cake pan.

Apples
3 large apples, peeled and sliced or 3 cups of small apples
Apples!!
2 tsp cinnamon (or more if needed)
1 1/2 tsp ground nutmeg (or more if needed)
1 1/2 cup brown sugar
2 tbsp cornstarch
1 tbsp butter

Mix all ingredients except butter together in a large bowl until incorporated.
Melt butter in a skillet or pot and add in apple mixture. Turn heat down low and simmer the apples, stirring occasionally until mixture thickens and the apples are tender. Remove from heat and set aside to cool.

Cake

3 blocks (250 g each) of cream cheese, softened
1/4 cup of the apple mixture, pureed
1 cup sugar
1 tsp vanilla
3 eggs

In a big bowl, on low speed, beat the cheese, the apple puree, sugar and vanilla until well combined. Crack on egg at a time into the cheese batter, beating on low speed. Scrape cheese batter into the cake pan.

Streusel Topping

1 cup packed brown sugar
1 cup flour
1/2 cup cold butter
1/2 cup oats quick oats

Cut butter, sugar and flour together to form course crumbs. Add in oats and mix evenly.

 Maple Butter Cream Sauce

2 tbsp butter
1/2 cup maple syrup
1/2 cup cream

In a small sauce pan melt the butter. Lower heat and add in maple syrup and cream. Stir and let simmer, while stirring occasionally until sauce thickens. Remove from heat and let cool.


The Masterpiece

Preheat oven to 320 degrees Celsius.
Evenly spoon the apple mixture over the cheese batter, making sure to cover the entire top. Sprinkle on the streusel topping, again, covering the entire top. Bake for 45-50 minutes or until set.
Remove from the oven, and cool. When pan is cool enough to touch, loosen edges of cake with a butter knife or rubber spatula. Unbuckle the pan and remove outer ring. Drizzle on the Maple Butter Cream and refrigerate for 4 hours or over night.
Sex in Your Mouth